
RWC Welcome Series
Worm Greetings!
This page was created so people could find all my welcome series e-mails in one place. This is different from the main RWC E-mail Archive, which contains my broadcast (sent to everyone at once) e-mails.
Not yet on the Red Worm Composting (Compost Guy) e-mail list? You can sign up >>HERE<< !
Worm Greetings!
Something that just never seems to fade away is the topic of what worms can and "can't" be used for vermicomposting.
I'm not sure if it's that people just can't wrap their heads around the idea that not all "earthworms" are soil worms. Or that some people just like being contrarian - insisting on fighting back against the established facts (maybe so they themselves can get more attention). Or if there is some sort of secret, underground (no pun intended) organization who has actually cracked the code in terms of breeding soil worms and making them as effective for processing wastes as the composting species (I'd happily join!).
I dunno - but I gotta say that it's one of the things that drives me absolutely bonkers.
I honestly try to avoid these conversations in the Red Worm Composting Facebook group as often as I can (there are enough sensible members to defend the cause - haha), but I was recently reminded of it while helping a new vermicomposter 1-on-1 (via FB chat) get a stacking system going.
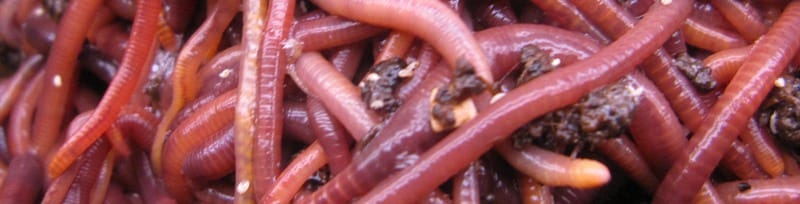
We'd already been through the basics - including the type of worms I highly recommend (Eisenia Red Worms and Euro Nightcrawlers are always my goto picks). This person seemed to be on the same page.
(Yep, you know where this is headed lol)
Then out of nowhere, they started telling me about the Canadian Nightcrawlers (CNCs) they had bought and were going to add to the system. I'm always nice about these sorts of things (even if I'm actually clenching my teeth and holding my head in frustration) so, I gently explained that CNCs are deep burrowing soil worms, that thrive in...soil, at cooler temps, in much less crowded conditions, with relatively modest amounts of organic matter (not heaps of kitchen scraps). All in a way meant to hint that they are NOT stacking tray system all stars. ;-)
The person immediately pointed me in the direction of a YouTube video proving that CNCs can indeed be raised in plastic bins. As soon as I followed the link, I knew exactly which video it was (others have pointed me to it in the past, maybe similarly assuming they were going to rock my vermicomposting "world view" with exciting new revelations).
Judging by the 1 million+ views, I'd say a lot of people are being influenced by this video (and maybe it helps to explain why these sorts of notions seem to be gaining steam).
Rather than being dismissive, confident in my knowledge and experience - I decided to not only (finally) watch the video from start to finish, but to actually watch the "6 month update" video from start to finish as well.
Firstly, I want to say that I really like these (fellow Canadian) folks who made the videos. Their channel is called "Wilderstead" - and they seem to have a lot of cool content relating to homesteading in Northern Ontario.
I won't even necessarily slam them for the worm videos. The main video is simply called "Raising Canadian Nightcrawlers At Home | DIY Dew Worm Farm". Yes, there is mention of potentially being able to produce an "endless supply of fishing worms", but I like to assume that is simply because they didn't know how the experiment would turn out when they wrote the description.
This is probably a good place to jump in and point out that we're not debating here about being able to keep CNCs and other soil worms alive in captivity. As avid vermicomposters (or vermiculturists), we all know that, alone, isn't a very productive goal.
We want to see significant conversion of wastes into vermicast.
We want to see significant population growth (or at least maintenance of a big population - along with achievement of goal #1)
Yeah, soil worms can quite easily be kept alive for extended periods in captivity. Some of the intermediate species will even breed fairly readily in captivity. But processing lots of your wastes and producing an "endless" supply of worms is a whole 'nuther ballgame!
Case in point - (and getting back to the video)...
Not sure how many people actually bothered to watch both videos all the way through. One very interesting detail in the first video is that he adds a lot of forest floor duff/soil (which I think is actually super cool since this is an awesome "living material"). He doesn't seem to consider the (very good) possibility that there might be other worms/cocoons in this material. Maybe even epigeic, forest litter worms, for example - lol.
In the second video - remember, this is a 6 MONTH update - he calmly estimates that although he added 4 dozen CNCs originally, he probably only has about 3 dozen left. Hmmmm...
What he (understandably) seems more excited about are the 70+ (he stopped counting) "babies" he found in the sytems.
It's hard to say for sure what type of worms these are, but I'd bet dollars to donuts that upon closer inspection, a lot (if not all) of these smaller worms were actually different types of worms - eg litter worms like Lumbricus rubellus.
I'm certainly not saying there is zero chance the CNCs bred. He actually finds what look like big cocoons that could potentially have been deposited by these worms.
And I'm also not saying the worms did "nothing" for 6 months. The material in the bin looks really nice, actually.
Really, it comes down to deciding what your idea of vermicomposting and/or worm breeding "success" looks like!
On the breeding side, some of you may recall my Red Worm population growth experiment where 25 adult Red Worms turned into:
193 adults, 1656 juveniles, and 476 cocoons (with me undoubtedly missing plenty of cocoons and juveniles).
In 11 weeks, not ~24 weeks!
That works out to a ~74X increase in total worms.
Saying soil worms are just as good as composting worms for...well...worm composting, is like me saying I could ride my bike to Florida just as fast as I could fly there.
Bike riding is great. I actually really like bike riding. If I really wanted to ride my bike to Florida, I technically could, assuming I didn't get murdered, or didn't encounter other major challenges (like just keeling over and dying) along the way lol.
Let's face it, if I REALLY wanted to get to Florida, a bike is more than likely not the mode of transportation I would chose.
Anyway - no need to belabor this point any further than I already have! If you want to get real worm composting/breeding results, work with real composting worms! That's all. :-)
Talk more soon
Bentley "Perspective is Powerful" Christie
P.S. If you are wondering how I might actually "breed" soil worms like CNCs, the answer is pretty simple (maybe even boring). I'd enrich an outdoor plot of soil with loads of organic matter (including a nice thick cover layer) - especially carbon-rich stuff like fall leaves, keep it nice and moist, maybe add some rock dusts periodically. That's basically it! :-)
Worm Greetings!
Some years ago now I came up with a concept I called the "Thrive/Alive Spectrum". Originally, it was created to explain how temperature can have a major impact on worm composting success. Basically, there is a range of temperatures in which worms will survive, but also a smaller range within that survival range where they will actually thrive. Generally the "thrive" zone is between 68 and 86 F (20 and 30 C) for the main composting species.
Over time, I realized that the Thrive/Alive Spectrum was an optimization model that could be applied to a wide range of different factors and scenarios.
Let's consider the "soil worms" example from the last email...
If you toss a bunch of soil worms in a typical worm bin, you are mainly going to see survival (if you're lucky, in a lot of cases). Even in situations where there is extended survival and even some breeding, you're not seeing a "thrive" performance from these worms. The real irony, though, is that even if you were seeing these worms firing on all cylinders, it still wouldn't hold a candle to what the composting worms are capable of.
It's just the 'nature of the beast' (literally)!
As touched on, there are all manner of things we can use this (T/A) framework for - not necessarily in a rigorously scientific way (good luck with that lol), but at least in a way that helps you optimize your vermicomposting efforts!
It does require that you: 1) Care, 2) Make an effort, 3) Learn from your mistakes, and 4) Don't give up! The people who stick with it usually aren't the natural "worm geniuses" who get everything perfect (not sure I have met a single one of these lol) - but they almost always are the ones who really end up reaping the incredible rewards of the process!
In the next email, we'll be looking at "The BIG 3" - what I feel are the 3 major factors that affect vermicomposting success.
1) Moisture/Aeration Balance
2) Food / Habitat Balance
3) Temperature (aka the "Hot/Cold Balance" lol)
The Thrive/Alive model is relevant for all of them. I won't claim it's necessarily easy to master these all the time - there are always plenty of nuances - but, there are some relatively simple ways to mostly keep things thriving!
---
As a parting thought, I encourage you to get into the habit of asking yourself - am I just helping the worms survive (which, a lot of the time, is no small thing - just so you know), OR am I truly taking steps to help them thrive?
There's no right or wrong approach here! It really just comes down to your own personal worm composting goals.
I will leave it at that for today - but do stay tuned for more worm composting fun!
Bentley "Often Surviving More Than Thriving" Christie
P.S. Don't assume that "lazy" vermicomposting - like my Passive Vermicomposting approach - means you aren't helping your worms thrive. I'd actually argue that a lot of people mess things up by trying to do "too much" a lot of the time!
Worm Greetings!
Last time, we talked about the "Thrive/Alive" spectrum.
Remember, "alive" is the bare minimum requirement for composting worms (for obvious reasons) - and there are times where, even if you can only manage that, it should be considered a "win" - but "thrive" is what we should...strive for as much as possible!
Relating to all this...
Over the years I've identified 3 key factors that seem to account for the vast majority of success (and failure) with vermicomposting.
I refer to these as "The BIG 3"
When you are able to master these - or at least get them as close to "thrive" as you can - things just get a whole lot easier!
1) Moisture/Aeration Balance - Composting worms absolutely LOVE it wet (a lot wetter than "wrung out sponge")! The problem is that the more moisture you have, the less oxygen you are going to have. Water can hold only a fraction of the oxygen that air can - and this is with an ideal scenario (i.e. pure water, cold temperatures, actively oxygenated). Once you start talking about nutrient- and microbe-rich liquids with a lot of biological oxygen demand (BOD), it become a whole 'nuther ball game altogether.
Still, keeping things reasonably close to "thrive" is easier than you might think!
Always make sure:
Your system has excellent ventilation.
That you have a LOT of absorbent, ideally bulky bedding/living materials in there at all times.
That you monitor the situation - not with a moisture meter (I've literally never used one for vermicomposting), but with your eyes and nose. It will look and smell swampy when you let things get out of hand.
2) Food/Habitat Balance - This is definitely one of the most common challenges, especially for newbies with smaller indoor systems, and there is likely a lot more gray area than with the other BIG 3 factors. A lot of people just can't seem to get it out of their head that their worms either: A) need super regular feedings, like most pets, or B) have crazy waste-processing abilities (eg consuming their weight or more in wastes per day...in a regular worm bin).
The key to success here is to always make sure you have far more safe habitat materials - namely bedding and living material - than food. At least 3:1 habitat:food most of the time is a good rule of thumb. If you completely load up your system with bedding and/or habitat-grade living materials, and then feed in moderation (ideally based on how quickly your worms are actually consuming the food) it's hard to go wrong!
3) Temperature (AKA the "Hot/Cold balance"!) - Of the BIG 3, this is probably the one with the BIGGEST impact - at least once it starts to veer away from ideal. Unlike the other two, temperature has very little gray area. When system temps are cool or cold the worms and other organisms slow down significantly. On the other end of the spectrum, when temps get too hot, it can stress or kill your worms. Always aim for 68-86 F (20-30 C) for "thrive", and 32-94 F (0-34 C) for "alive".
Bottom-line, when someone says they are having issues with their worm bin, I tend to feel a little bit psychic...not because I have any sort of "gift", but because I can predict, with incredible accuracy, that their "problem" will fall within one of these 3 BIG areas! :-)
There are lots of nuances with vermicomposting - and experience is really the only path to total mastery - but, if you at least zone in hard on these "BIG 3" factors, making sure to get a solid handle on the fundamentals along the way, it will be tough for you to go completely wrong with your efforts.
On that note, I am going to sign off for today, but in upcoming e-mails I will be delving more deeply into some of the sub-topics relating to the BIG 3. If you're feeling any haziness about what you've learned so far, definitely stay tuned! I can almost guarantee the fog is going to lift in a...BIG way. ;-)
Bentley "Made Every Vermi-Mistake in the Book" Christie
Worm Greetings!
In my last series installment I introduced what I refer to as the "BIG 3" factors.
Just to refresh your memory, the BIG 3 are the factors I feel have the biggest (by far) impact on your level of vermicomposting success.
They are:
The Moisture/Aeration Balance
The Food/Habitat Balance
Temperature (The "Hot/Cold Balance" if we want to keep things consistent lol)
Today we will dig in a bit more with the Moisture/Aeration Balance
This is a funny one...
Coming up with definitive statements about it is kinda like trying to nail butterscotch pudding to the wall (perhaps a bit more specific than I needed to make it lol).
A lot of the re-hashed educational content floating around online offers the standard, knee-jerk "wrung-out sponge" (WOS) moisture advice for all types of composting.
This is fine.
You're certainly not going to be killing off worms (via dehydration) in a wrung-out-sponge-dampness-level habitat.
And maybe...if I mull it over even more...I can see the actual value in this recommendation for newbies working with plastic systems that have little to no drainage. A lot of food scraps are very water-rich after all!
Still, when it comes down to it, most composting worms prefer a higher moisture content than "wrung out sponge". Let's assume that this (WOS level) is about 50-60% moisture.
Well, the worms would definitely prefer 70-80%, if not higher!
Again, our mission (especially if we are more experienced) should always be to establish/maintain a habitat that is a wet as possible, yet still well-oxygenated.
I always encourage the use of systems with excellent ventilation - even completely open if you feel comfortable with it (and are willing to keep an eye on things). If it is a purchased system that doesn't come with excellent ventilation - just add more air holes, or employ other aeration-boosting strategies.
Habitat materials that not only allow good airflow, but that also hold moisture really well are invaluable. This is one reason habitat material diversity can be so important. If you consider a material like straw, for example, it has excellent porosity (lots of space between the pieces of straw - even space through the middle of it)...but it is not nearly as good at actually soaking up moisture as something like coir or even shredded cardboard.
Unless that straw is quite rotten - at which point you are heading towards having a "primary living material" - something that can check off ALL our boxes (airflow, moisture-retention, microbial boost). But I'm not gonna dive too deep down that worm hole just yet! ;-)
What about drainage?
There are definitely some perks to allowing excess moisture drain away - and in outdoor systems this tends to be par for the course.
That being said...
Over the years, my feelings about drainage - at least in the case of regular "worm bins" - have shifted. For one thing, drainage tends to be a messy hassle that needs to be "dealt with". And let's definitely NOT get into a discussion about "tea"/leachate today! lol
The other big thing for me is the loss of valuable nutrients and other beneficial compounds. I love the idea of conserving as much "good stuff" as possible.
There is also something to be said for the discipline of proper worm bin moisture management - something you need to master if working with enclosed plastic bins that don't drain!
Still, it's really just a matter of preference and your definition of "convenience". I personally find leachate management more inconvenient than system management - but whatever floats your boat!
OK, before I sign off today...
I'm sure some people are wondering how they will know if they're on the right (or wrong) track will all this moisture/aeration stuff.
The simple answer:
Look. Feel. Smell.
Does the habitat look nice and damp? (Yes? Good)
Does most of the habitat seem really dry? (Yes? Not so good)
Do you see a lot of liquid pooling in the bottom? (Yes? Not so good)
Does the habitat feel quite damp to the touch? If you squeeze some, do you see a little stream or at least quite a few drops coming out?
Yes? Good - but only if the rest checks out.
What does the system smell like when you dig around (really dig around)? Does it have a nice earthy smell / no real smell - or are you picking up swampy, foul (generally unpleasant) odors? I'm sure you can guess which one we're after.
NOTE: the smell test isn't always flawless, since it is fairly normal to have anaerobic microsites, and also since certain types of wastes are just plain prone to putting up a stink (e.g. cauliflower and kin with their stinky sulfur compounds).
Alrighty - definitely enough for this installment. In my next series e-mail I'll start exploring the food/habitat balance. It's an especially big topic, so there will likely be more than one e-mail about it headed your way.
Don't hesitate to let me know if you have any questions - or something you want to share!
Bentley
Worm Greetings,
In our last series installment, we looked at the “Moisture/Aeration Balance" - which hinges on the simple idea that Red Worms love their habitat “wet” as long as it is reasonably well oxygenated.
Trying to achieve that perfect balance can be tricky, but you can really help the situation by using a system with really good ventilation, along with habitat materials that can help to support that airflow (allow the air to get where it needs to go).
This brings us to our next “BIG 3” factor of importance - what I call the “Food/Habitat Balance".
Most people use the terms “food” and “bedding” when they talk about vermicomposting. This is totally fine - but also somewhat limiting, at least as far as the way I recommend people set up and maintain systems.
Unfortunately, some make the situation even more confusing when they refer to materials like manure as “bedding. In my humble opinion this is a really bad idea, since the spectrum of different kinds of manures/ages/stability is very broad. Simply put, most fresh-to-moderately-fresh manures should definitely NOT be thought of as a “bedding” material.
But we’re getting ahead of ourselves here.
I absolutely still see “bedding” as an important term - and I’ll dig into the topic a fair bit more in these e-mails - but I now always prefer using the term “habitat”, because there is another category of material I constantly mention, and encourage people to learn more about - what I refer to as “living material” (LM).
Food is the blanket term I use for all the nutritionally-rich stuff we add to a worm composting system. Basically the higher-nitrogen (lower C:N) materials - and often the water-rich materials as well (but not necessarily). You can think of it as “unstable”...it really wants to break down and achieve some stability, darn it!
Our job is to help it achieve this stability in a relatively-aerobic environment, without too much drama along the way. Lol
This is where our safe habitat materials come in!
Bedding (as I refer to it) refers to the carbon-rich (high C:N) materials we add. These are quite stable due to the tough structure and C:N that microorganisms have a more challenging time working with. Ideally, you should have some bedding that is bulky and supports good airflow, but also some bedding that has excellent moisture holding capacity.
Living material (my version) refers to materials that are quite stable as a result of decomposition (ultimately, humification) and also potentially a stable structure to begin with. A simplified (?) way of saying this is that if you let any type of biodegradable material (whether low C:N or high C:N) decompose aerobically, it will eventually break down and stabilize.
With the really high C:N materials there is a lot more flexibility and a lot more potential on the LM front. E.g. if you let a bale of straw, or stack of cardboard sit and rot for a while, a lot of the original structure may still be intact, but it can be a fantastic living material. Like a “bedding” on microbial steroids - lol. With the "food" types of materials, you need to be a lot more careful about when you designate them as LMs (they should basically be a compost by that point).
Don't worry if any of this is seeming a bit confusing - future e-mails (and other resources recommended) should help clarify things.
I divide both these categories of safe habitat materials into “primary” and “secondary” sub-categories to further help people see how some are better in certain situations than others (etc). We will get into this breakdown in the next series e-mail.
Stay tuned (and don’t ever hesitate to let me know if you have questions/comments along the way).
Bentley “I Wish I Was More Stable” Christie ;-p
Worm Greetings!
In my last series installment I started unpacking the topic of the “Food/Habitat Balance" (one of my BIG 3 key factors of importance). As touched on, this refers to the balance between the highly-nutritious (but somewhat "unstable") materials we call "foods" and the safer "habitat" materials we mainly add for system balance and structure.
For most people, the latter category is basically just the same thing as “bedding” - and that’s perfectly fine. I prefer to include what I refer to as “living materials” (LMs) as well. This is a bit of a quirky topic I started writing about many years ago, after spending a lot of time collecting worm-rich material from outdoor horse manure heaps.
I was absolutely blown away by the productivity of these essentially “accidental” outdoor habitats. No one was doing anything to “take care of” the worms in these heaps. If anything, it was the opposite - with frequent disturbance, moving the material out to fields etc - yet they contained some of the most productive Red Worm populations I had ever encountered.
When I added the same material to my regular worm bins they thrived like never before. It almost felt like a “cheat code” for successful vermicomposting.
Long-story-short, I started testing out a variety of other partially-decomposed substrates, wrote a Living Material Guide, and have been pretty obsessed with this category of habitat material ever since.
Before I tell you anything (helpful/useful) about living materials, it is very important to point out that this is a topic that can confuse people, especially those who are fairly new to vermicomposting. There are definitely some nuances, especially with materials on the outer fringe of the category - but the good news is that there are also some fairly simple guidelines to help the average vermicomposter lock in on what is and isn’t included.
As touched on in the last (series) email, similar to bedding materials, I have broken down LMs into what I refer to as “Primary” and “Secondary” sub-categories. Both can be highly beneficial, but each has its advantages in particular situations.
Primary LMs - I tend to think of these as the ultimate all-in-one types of habitat materials. Not only are they loaded with beneficial microbes and other organisms, but they also offer highly valuable habitat structure. You could literally just add one of these as your starting material in a new vermicomposting system, along with a modest amount of food, and you would be good to go (well, assuming you add some composting worms too lol). Aged, bedded manures - like the old horse manure I mentioned earlier - things like rotten straw, even wood chips (if really rotten), rotten fall leaves, rotten cardboard. These are all great!
The recurring themes with all of them are: 1) being "rotten" and 2) containing a high-carbon, structural element.
A very simple way to think of this using the "browns" and "greens" composting concepts is to assume that any really rotten "brown" - especially the bulkier ones - is likely going to be a really great primary LM.
I do realize my mention of manure will throw some people off. Even if the color tends to be brown (lol), fresh manures are actually "greens". What I am talking about, though, is: 1) aged, and 2) bedded (i.e. mixed with lots of high-carbon bedding materials like straw and wood shavings) manures, which are a different can o' worms altogether.
I'm sure we will come back to manures further along so I will leave it at that for now!
Secondary LMs - You can think of these as more "concentrated" of the two types of living material; basically, organic matter that is on the tail-end of the decomposition process. Think dark, rich, soil-like...stuff. So, various types of compost (including castings), compost screenings, really old "leaf mold", really old livestock manure - even a decent quality organic soil (with a bit of an exception we will come back to in a minute). Is it dark, granular/crumbly, earthy smelling? Does it come from a fairly "natural" source? It is probably a secondary LM.
Secondary LMs are the ones that are great for sprinkling in during the system set-up process as an inoculant. They are also great when you want to make some sort of "homemade manure" (a topic I aim to circle back to in this series).
What about bagged manures/soils? Are these LMs?
This is (understandably) something a LOT of people wonder about as soon as they start learning about the topic of living materials. Bagged amendments are easily obtained, often fairly inexpensive - and they look like they fit the bill!
Some of them can be OK as a habitat material, but it is important to keep in mind that a lot of them are pretty sterile, and they can also contain elevated levels of various salts (including fertilizer salts, in the case of some potting soils), which can be harmful for worms. So, I tend to recommend avoiding them.
What are absolutely NOT "living materials"?
Firstly, keep in mind that MY use of this term may be different from other people - even those who have learned the concept from me. So always make sure you are clear on what somewhat else is referring to before making any assumptions.
According to my definition of LMs here are materials that definitely don't qualify:
Any form of fresh or partially decomposed "green". Yep, some fresh plant matter is technically still "living"...but it is almost the opposite of what I am talking about. If it decomposes to the point of basically being compost...you have a secondary living material. But kitchen scraps (etc)? These are in the "food" category.
Regular garden soil. A lot of people (too many people lol) are obsessed with the idea that worms need soil. Heavy mineral soils have NO place in a worm composting system - ever! As touched on, some form of lightweight, organic soil (not out of a bag) is definitely different - and can likely be used as a secondary LM.
Similar to #1, any sort of fresh manure is definitely not an LM. I recommend checking out my Manure Report to learn more about this valuable (but sometimes confusing) group of materials.
OK, as important as the topic of LMs is, I think this is enough of an "eyeful" for today - and there is no doubt that we will circle back quite a bit in future e-mails.
In my next (series) installment, we will spend some time looking at the more "normal" habitat material - bedding - before we move on to food.
Don't every hesitate to let me know if you have questions along the way!
Bentley
P.S. And if you want to dive in further with living materials, be sure to check out the guide (mentioned earlier and also linked below).
Worm Greetings,
I had planned / promised to move on to the topic of “bedding” in this next series installment, but I received an e-mail from a long-time reader who still wasn’t sure what I meant by “living material”.
Like I said, this is definitely a topic with some nuances - so I completely understand!
Hopefully this e-mail will help to clear things up.
WHAT is “living material" and WHY is it valuable?
“Living Material” (LM) is a concept I came up with 10-15 years ago (all a blur now haha) to describe certain types of material that aren’t really bedding, and aren’t really food - although they can sometimes offer the benefits of both.
The KEY thing to remember is that they introduce the (oh so important) microbial element to a worm composting system.
To illustrate…
The person that reached out was describing a new system they had set up, essentially only using damp cardboard. I think this is fantastic as a starting place (cardboard is probably my favorite bedding material - and the worms love it), BUT... the system still needs materials that are going to help the worms feel more at home.
Think “forest floor”, “compost heap”, “old pile of leaves”, “really rich organic soil”...
Dark, earthy-smelling stuff - absolutely loaded with the sort of microbial ecosystem (and other helpful organisms) we want to establish in our worm bin.
When you stock a new worm bin with worm-rich material from another active system, you are basically introducing plenty of nice living material (it's hard to beat the actual habitat the worms were already living in). This helps to explain why systems started this way tend to hit the ground running (the more “natural” worm densities help as well), and why I tend to recommend this as a new system start-up strategy anytime it is an option for someone.
With bulk worms (worm quantities based on weights or counts) - especially when ordered online - you tend to get a gob of stressed out worms in peat moss or a similar substrate. So, you are combining stress with pretty sterile conditions. And when the system you introduce the worms to is also pretty sterile, this can lead to issues.
Providing them with a home that…feels like “home” is going to be a big step in the right direction!
Of course, LMs have great perks beyond helping you get a new system ready for worms. You can also think of them as an ongoing system conditioner - helping to keep things much more balanced, especially when you are adding a lot of kitchen scraps as your food source.
“OK, I Think I Understand What Living Materials Are and Why They’re Helpful, But WHERE Can I Get Them?”
Here are some commonly available LMs:
Old rotten leaf litter
Old rotten wood chips / sawdust
Old rotten straw/hay
Old rotten livestock manure from outdoor heaps (especially the stuff that was heavily bedded)
Compost and decomposed bedding from any aerobic composting system.
Lightweight, organic soils - NOT regular dirt (mineral soil) - NOT something from a bag (unless the bag has been open and exposed to the elements for a while).
Even old grass thatch (if you haven’t used fertilizers / pesticides on lawn).
Hopefully some recurring LM themes become pretty evident when you read through that list! ;-)
You can even “make” a living material very easily - it will just take some time. Damp bedding + a small amount of food waste (or some other nitrogen source) + a pinch of compost or living soil (or any other LM mentioned above) sitting in a plastic bin with some ventilation, and left alone some place fairly warm, should become a really nice living material.
Again, you can find a more detailed exploration of this topic in my Living Material Guide.
We will definitely be moving along to the topic of “bedding” in my next series installment but don’t hesitate to let me know if you have any LM questions!
Bentley
Worm Greetings!
I got outside for some overdue yard work yesterday. I’ve been dreading it. The exact same way I dread it every, single year, once spring finally settles in (and there’s no more hope of random blankets of snow covering up my fall “best efforts”).
It was sunny - and likely less than 10 C (50 F), but it wasn’t long before it felt like…paradise.
I always smile when I think about this stuff after the fact. Sunshine. Fresh air. Some light physical labour. A sense of accomplishment. How on earth do I convince myself this is something I need to avoid?
It’s a mystery.
I dragged my son out with me. He’s 15 now, and definitely needs to develop a stronger appreciation of this type of “hard work”. Like most parents, I feel like I had a greater appreciation of “hard work” when I was his age. Also like most parents, I’m probably full of crap.
As expected, he was miserable when we first got out there. “HOW long do we need to be out here?” “WHAT exactly are we out here for?” “WHEN will it be done?”
Maybe not word for word quotes - but not far off.
I’m not a lecturer per se…but I will admit to giving him some lectures - lol.
What’s great is that he too experienced a positive shift once he got focused on some specific tasks I had assigned - even reaching the point of actually apologizing for being a bit crabby earlier.
So what’s the point of this long-winded lead in? I’m not really sure. Maybe that even small, simple things can make a big difference if you give them a chance - or that sometimes (as often as you can) it’s a good idea to ignore that nagging, negative voice in your head and just do what needs to be done.
But I digress…this wasn’t meant to be a self-help piece lol. What actually inspired it was of course grass thatch!
Seeing the growing pile of thatch as I raked my lawn, I was reminded of the fact that this is a pretty interesting material - one that doesn’t sit rigidly in any one category. It has some food value, it has some bedding value…even some value as a living material, believe it or not. Yet it’s not something most people would think to add to a vermicomposting system (especially not a worm bin).
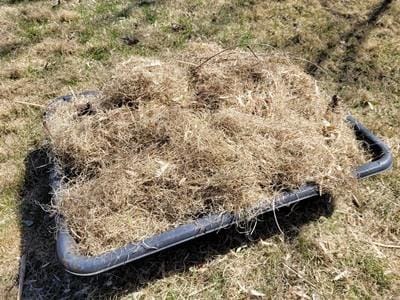
Just in case anyone isn’t familiar with the term “thatch” - this basically just refers (primarily) to the dead grass that accumulates on a lawn over time. Naturally, it can include any number of other components - depending on what else has fallen onto - or been added to - your lawn.
It’s also important to point out that the timing of your thatch harvest can make a big difference in terms of the type of material you end up with.
My “early spring” (here in Ontario) collection was almost entirely dead grass, and other debris that happened to be on the lawn (e.g. dead maple keys). Raking later in the spring would undoubtedly yield a higher proportion of green grass - giving it more “food” value.
Just something to keep in mind.
Thatch Usage & Caveats
Lots of thatch can be used as-is, but if you want to age/enhance it a bit, I suggest putting it in some type of plastic bin (lightly moistening it first if it is very dry) - even a plastic bag would work - and leaving it to sit for a week or two (definitely no harm in leaving it longer, though). At this point, it will be even more of a “living” habitat material, and your worms should love it.
You can add it, along with more typical bedding during a new system set-up (2 parts bedding to 1 part thatch should work well), or simply add it as a cover material in an active system.
Hopefully it goes without saying that thatch from lawns where pesticides - or inorganic fertilizers (any time recently) - have been applied, shouldn’t be used for vermicomposting.
It’s probably important to also establish that thatch and actual grass clippings are very different materials. The latter, while offering plenty of potential as a “green” in outdoor systems, should be treated with a lot more caution.
I will leave it at that for this installment. We will get a bit more focused on actual “bedding” in the next one.
Don’t hesitate to let me know if you have any questions, or experiences to share. I always love hearing from readers!
Bentley
P.S. After my last “living material” e-mail, a really good question came in relating to the viability of microbes in material sitting outdoors, exposed to harsh winter conditions (i.e. does this basically “sterilize” the material). I don’t have a definitive answer, but what I do know is that microorganisms definitely have strategies for surviving severe conditions - typically some form of protective resting stage. My hunch is that it is all in the lead time, prior to exposure. If you toss compost straight into a chest freezer, for example, my guess is that would have a pretty devastating impact on the microbial community. If materials have been sitting outdoors as temperatures start to drop in the fall, it seems much more likely that they will have the chance to properly prepare for winter conditions - although, just how severe the conditions are, and how exposed the material is, both likely have a major influence.