
RWC E-Mail Archive

Welcome!
I created this page for people who enjoy my e-mails, and want a location they can find them . That said, it is important to note that these are "Compost Guy [RWC]" broadcast e-mails, not educational series emails (you can find those >>HERE<<) or the ones from the original Red Worm Composting e-mail list. Also, for the sake of getting this page published, I've only included e-mails from 2026 (may add some older ones over time). NOTE: The body of the e-mails can be opened and closed using the little arrows on the right hand side of each entry.
Not yet on the Red Worm Composting (Compost Guy) e-mail list? You can sign up >>HERE<< !
Worm Greetings,
As many of you will know, during the past 5 or so years I’ve become very interested and involved in the use of isopods for organic waste processing.
They bring some unique talents and tolerances to the table, in a way that makes them a great partner organism for composting worms!
What’s funny is that I almost abandoned most of this “isopod stuff” a year or two ago when it just didn’t seem like many people were interested in the topic.
I wasn’t offended or anything (I can see how isopods might be a little less appealing than worms). It was more a matter of me just me wanting to avoid boring most of my followers to tears, or worse, completely driving them away.
Also “funny” is what happened next…
I got a bit lazy, and ended up leaving some of my basic “hybrid” systems running down in my basement, since it would have been more of a hassle to actually clean up. Haha
I didn’t pay much attention to them for an extended period - but I paid just enough attention - and then started putting in just enough effort - to realize how special these little “bioreactors” truly were.
They are completely open systems, so there is incredible airflow, but also very dry conditions up top - and yet they are still processing waste materials at a surprisingly fast rate.
They receive a lot of bulky, resistant - very intact (i.e. no microbial colonization) material - and yet, once again, this stuff is getting processed at a surprisingly fast rate.
They seem to have a ‘superpower’ for virtually eliminating flying pests (in situations where these organisms would absolutely be taking over normally). I’m not sure if it’s superior competition or actual predation - or some combination of the two - but it is definitely different from what would happen in a similar situation with only worms.
The mind-boggling isopod biomass, along with all the resistant, bulky left-over wastes (e.g. woody materials) had me expecting to see a pretty minimal amount of end product...but that wasn’t the case at all when I harvested my “big mama” system (written about previously)! I ended up with a big bin full of nicely screened castings!

The improved processing power (especially for resistant materials) is one thing - and no small thing - but I knew that I would need to test the compost out in the garden a lot more extensively this season if I wanted to get the full picture.
I had done some limited testing previously, and the results seemed promising, but this was the first year where I really got the material involved in my gardening efforts in any sort of serious way.
I used it to make mixes for seed-starting, growing young plants, and getting my planters going, but I also added it as-is down in the bottom of most of my planting holes.
The results so far have been very positive!
My gardens have been out of balance for quite a few years now. While I’ve been able to grow at least some crops each season, I've been plagued by pests and, to a lesser extent, disease - both of which have reduced the rewards of my efforts substantially.
This season already feels different. A lot different.
I am still seeing some pest activity, but it’s nothing like it has been in recent years. The plants seem to be warding off the bad guys a lot more effectively, and just generally looking a lot healthier.
Interestingly, the garden that seems to be doing the best is the one I made in the spot where I had a ‘iso-worm’ GeoBin composting system going last season - even though it doesn’t get nearly as much sunlight as some of my other beds!
And another nice surprise…
Not only do I still have quite a bit of the original iso-vermicast I harvested this spring, but my rebooted “Big Mama” system is already well on its way towards being ready for harvesting again!
All of this has me feeling like more people should be starting up these ‘bargain basement bioreactors’!
[Even if most people don’t care about isopods, darn it! lol ]
They are undoubtedly one of the most effective - yet basic (and inexpensive) - composting systems I have ever worked with - and they clearly produce some pretty awesome compost as well! They also produce loads of isopods, which have good potential as a live food for chickens and other animals (our pet bass ate tons of them, before we let him go).
Yes, there are some nuances involved in getting one of these systems up and running effectively (something I aim to write more about if there seems to be some interest), but it’s definitely not rocket science! And, as I discovered, once you get a small number of factors dialed in, it is incredibly easy to find success with this approach!
I will leave it at that for today - but hope to be back in touch soon!
Bentley “Iso Stubborn” Christie
Warm Greetings!
Yep, you read that right. No need for my usual (silly) pun today when it is this…freakin…hot.
The summer started beautifully…a little too beautifully. I was just waiting and watching for the ‘hot n humid’ hammer to drop. And of course it finally did…with authority!
Hopefully all those of you in hot regions (aka probably all of you - haha) are finding ways to stay cool and, even more importantly, stay sane these days!
One thing warmer weather brings back with a vengeance is fruit flies.
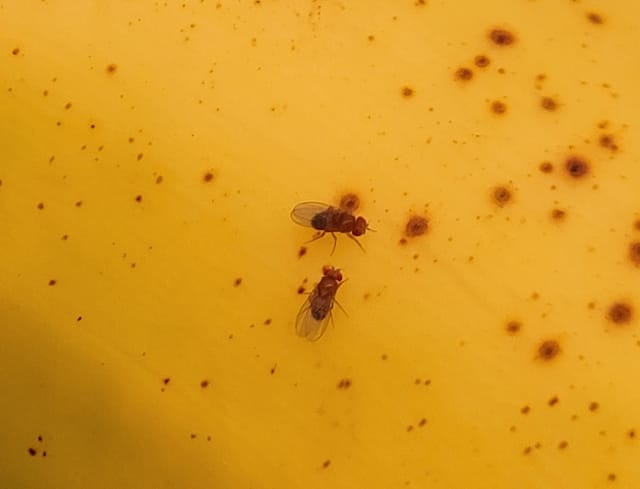
And it’s not just a treat for those who don’t manage their kitchen scraps properly. These little SOBs arrive locked and loaded in the rinds and peels of many of your favorite (fully intact) fruits. They don’t call them fruit flies for nothing.
This sort of “unfair advantage” doesn’t help the chances of even the most attentive vermicomposters among us to keep our systems fruit-fly-free. And I’m going to tell you right now, if you have any sort of outdoor system, do not even attempt to control them. You’re gonna lose that battle. You're gonna lose that battle 10 times out of 10.
One helpful strategy, that also offers additional perks, is freezing your scraps. Apart from killing any fruit fly eggs and larvae that may already be in the materials, it also helps to initiate the breakdown process of water-rich scraps, killing tissues, bursting cell walls - making everything more exposed to decomposition microbes.
IMPORTANT NOTE: Please don’t assume that frozen food scraps offer a great way to cool your summer systems down, however. While they can initially lower temperatures, once those scraps fully thaw you can actually see the opposite effect. The materials are much more prone to microbial invasion - and all the microbial activity can lead to heating. This is mainly a caveat for those who are tempted to add more food than normal so as to enjoy the cooling effect. Something like frozen water bottle rotation is a better option in this case.
Once fruit flies are already getting established - whether it is in your fruit bowl or your worm bin - some other strategies are likely going to be needed.
Simple apple cider vinegar traps are pretty decent as a basic passive method…but one of my favorite (more active) strategies - which probably gives me more joy than it rightfully should - is vacuuming those suckers up.
It might sound funny, perhaps with at least a hint of “weird”...but this is an incredibly effective way to reduce the number of fruit fly “breeders” quickly - and it is all the more effective the more regularly you do it.
Normal vacuums, or even shop vacs will certainly get the job done, but you may find them a little too powerful, maybe leading to some collateral loss from your counter tops (did you really need that $100 bill?)
I love my Ryobi rechargeable hand vac!
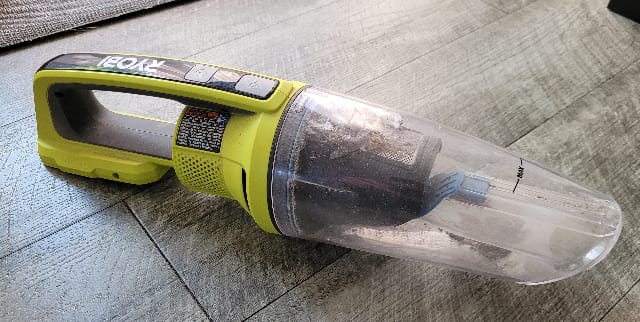
As an actual vacuum it is in short supply of “super powers” - but for sucking up fruit flies (or any other flying offender) it seems to have the just the right level of suction to get the job done without creating more headaches. And it is small and portable!
This isn’t meant to be a handy vac commercial, but rather a testimonial for these types of devices should you happen to already have one. ;-)
It’s important to note that the best fruit fly strategy almost always involves a multi-pronged (and somewhat relentless, if well-established) approach!
Obviously, prevention is the best place to start if you can manage it, but if push comes to shove and you start spotting these guys…don’t wait to start doing something about it!
If this is a topic of interest (or concern) be sure to check out this oldie-but-goodie article from the RWC blog:
Getting Rid of Fruit Flies and Fungus Gnats
And if you have your own effective strategies for dealing with these annoyances, be sure to hit reply and let me know!
Hope to chat more soon!
Bentley “If Reincarnation Exists I Will Come Back as a Fruit Fly” Christie
Worm Greetings,
My previously consistent-ish email schedule (“newsletter schedule”, if you prefer) has suffered in recent weeks due to some lack of inspiration, a lot of busy-ness, and the demise of my beloved laptop.
The good news (if you like these messages) is that some things have at least continued to roll along behind the scenes.
A little while ago I ended up making a new “homemade manure” mix that included the rest of my fermented rice and seeds mix - which had been sitting in the fridge - some of my “isopoo” (you may remember that I harvested quite a lot of it a little while ago)...along with various other ingredients.
But before we get to that - let’s revisit the topic of “isopoo” / “isopod frass” / “isocast” (whatever you want to call it)...
Back in February (on Valentine’s Day in fact lol) I wrote about testing the material as a primary worm food after seeing some promising results in one of my bins.
From the start of this isopod “deep dive” I have always felt that the isopods + worms combo was the real key…but I came to realize that the way I had been operating my hybrid systems was definitely favoring the isopods. So, I was starting to think that a 2-step process - even when composting worms are in the first system - might be the way to go.
I set up a little yogurt container test bin - initially with some shredded cardboard, isopoo and some frozen carrot peels (just to help get things going). I added a small number of very young worms...and then, from that point on, only added moistened isopoo as the food source (and not very often at all).
I won’t claim the results were earth-shattering, but some very important baselines were established. Not only did the diet not kill or even harm the worms in any way, it seemed to work quite well as a basic food source - much better than just adding more shredded cardboard would have.
When I dumped the yogurt container out fairly recently I found lots of rich looking worm castings, fat adult worms, quite a few juvenile worms, and plenty of cocoons. Not bad for a super-basic little system. Speaking of which, it’s important to acknowledge that the container itself was pretty limiting. I should really try this again in an actual bin for a proper assessment.
Obviously, if I had used something like aged horse manure as the main food source the results would have been more impressive. This (isopoo) is pretty “finished” stuff - similar to worm castings, but also distinctly different.
It actually reminds me of a cross between peat moss, coffee grounds, and finely ground “leaf mold”. Very interesting material!
I have zero plans to start using it as a sole food source (other than in experiments) - but where I am starting to see a potential “sweet spot” is using it as a vermicomposting system supplement - a form of “living material” that can help to enhance and balance out more typical worm feeding practices.
Any time I mix it with regular worm food (such as fruit/veggie wastes) it seems to stimulate significant fungal growth, which is interesting both from a decomposition standpoint but also from a “worm food” standpoint.
This brings us back to the “homemade manure” (HMM) mix I recently made…
For those unfamiliar with the term “homemade manure” (links to a search for the term on the RWC blog, in case you want to peruse some of my previous writing on the topic) - this is a concept I came up with many years ago as a way of producing food mixes for composting worms that offered a lot of the same benefits as livestock manure, without needing the manure (although you can make even better HMM if you do happen to have some of the real stuff available).
The 3 key components of HMM are: 1) high-carbon “bedding” materials, 2) nutrient-rich (and usually water-rich) “food” materials, and 3) microbe-loaded “living materials”.
The different combination and proportion possibilities are endless - but the main thing to remember is that when you put a lot more emphasis on the bedding and living material you end up with a “habitat-grade” HMM, whereas if you bump up the proportion of food materials you end up with more of a “food-grade” HMM. Both are highly valuable - but how you should use them is definitely different.
I’ll admit that I never follow any specific “recipes” when making HMM. By this point, I have a very good “feel” for how to make the end product I’m after using the supplies I have on hand. But, I do see some value in documenting different mixes (and how they perform), especially for the folks who are serious about worm population growth (e.g. those with worm businesses etc).
OK - let’s now look at the recent HMM I made.
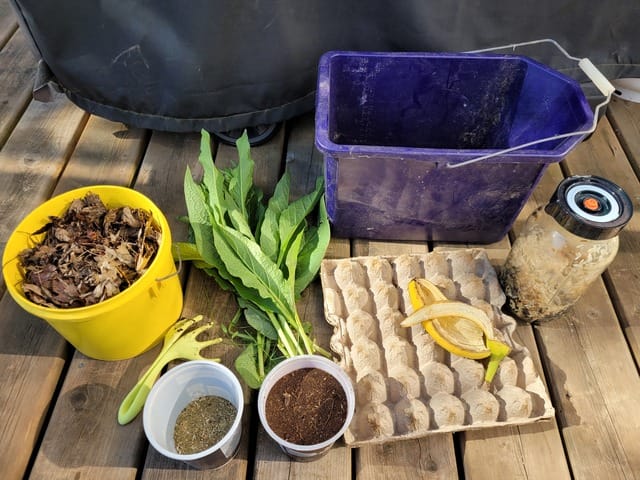
It contained:
The remainder of the fermented rice/seed mix
Egg carton cardboard (ripped up)
Fall leaves
Isopoo
A specialty vermicomposting supplement I helped to develop
Comfrey (chopped)
1 random banana peel (chopped)
Step #1 (technically a small number of steps in one) involved mixing the ripped up cardboard with the rice/seeds mix, the speciality supplement, and the isopoo. Some additional water was needed to get everything out of the fermentation jar, and just generally to get the initial moisture level where I wanted it to be.
Next, I add the leaves along with chopped up comfrey and banana peel.
Then, I mixed everything up really well, and once again added enough extra moisture so the mix was nice and damp, but without liquid pooling in the bottom.
I then covered the mix with a loose plastic bag and left it to sit. The exact timeline is hazy by this point, but I think it was just shy of a week.
When I decided to put it to use, the mix was quite a bit darker and it was obvious that there was a lot more fungal growth present. I added it to several experimental vermicomposting systems, and a couple of hybrid isopod systems.
The worms were clearly drawn to it right away - it didn’t take long to see that quite a few had moved into it. The initial isopod interest was a bit less obvious, but it did seem like they had consumed it not too long after it was added.
Circling back to my use of isopoo as a system supplement (for the record, I have also been testing it out a lot in the garden as well - I just happen to have a lot of it to “play with” at the moment), I’m really loving the way it helps to balance out water-rich food wastes. Although it seems quite dry for a compost, it’s not difficult to re-wet at all, and actually seems to wick up moisture beautifully, while no doubt also adding a microbial injection that helps with the breakdown process and keeping things balanced.
One of my current “worm bins” where I have been adding this stuff is actually the closest I’ve come to achieving a “perfect” hybrid system. The worms are clearly thriving - and in makes sense since it is an enclosed plastic bin system that is receiving fairly regular deposits of water-rich food waste - but what’s surprising is just how well the isopods seem to be doing in such a damp, relatively-low-airflow environment.
I will be very interested to see what sort of castings I end up with from this one (and it actually looks like my first harvest shouldn't be too far off). No need for a 2-step process this time around!
Anyway - I should probably leave it at that for today. This is already a lot meatier than I prefer for a single e-mail!
Talk again (hopefully) soon
Bentley
P.S. I’ve recently been thinking a fair bit about bokashi and how you can partner it with worm composting. This is something I’ve done quite a few times over the years, but I’d love to find out what sort of experiences subscribers have been having related to this as well. Could make for an interesting upcoming e-mail or two.
Worm Greetings,
I’ve been pretty consistent with getting at least one e-mail sent off each week for the last little while, so I really didn’t want to mess with my “streak”.
Just a couple of updates for you today
1) Fermented Worm Food
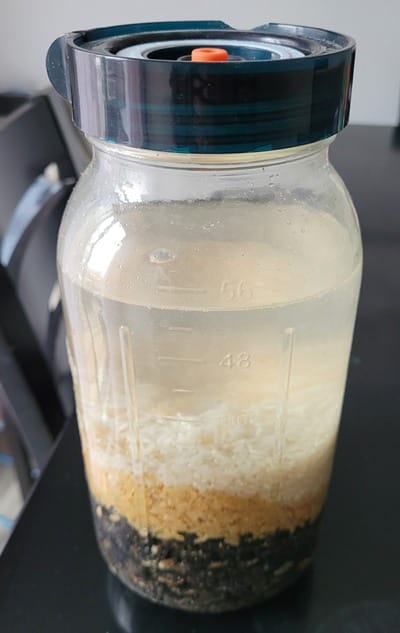
Back on May 9th I wrote about a little fermentation experiment I started thanks to the inspiration from subscriber replies I had received relating to my “rice water” and “fermented carrots” e-mails. I decided to see what would happen if I tried to ferment some old rice (brown and white) and sunflower seeds - with the goal being to create some form of “worm food”. I ended up leaving my fermentation jar going for 6 days. During that time, the volume of the rice expanded quite a bit, the water got cloudy, and the odor developed a certain sweet “tang”, telling me some fermentation had definitely happened.
In my mind I basically had two fermentation “products” to play with at this point: 1) the rich, cloudy liquid, and 2) the actual rice and seeds. I used a lot of the liquid to make a form of “homemade manure” (links to one of my old blog posts on the topic). Initially I mixed it with hand-shredded egg carton cardboard, fall leaves, and some iso-worm castings. I left this to sit in a small bucket (with loose plastic bag cover) for a few days. When I saw that there was still liquid pooling in the bottom, I added some pieces of a hemp fiber blanket I happened to have, to see if I could achieve a better moisture balance.
The resulting mix progressed really nicely from there - developing a very obvious fungal mycelial network. I certainly could have “souped it up” in various ways to make it into more of a food mixture - but instead opted to leave as is. I have now added it to several different systems to see what the worms think!
As for the fermented rice and sunflower seeds, I’ve started adding that mix to systems as well. My initial impression is that - similar to bokashi “precompost” - these fermented materials aren’t necessarily immediately-appealing. This is likely due to their acidic, anaerobic properties.
That said, in one of my systems, it does look like worms are already starting to get more interested in it, so it will be really interesting to see how things progress from here!
2) Big Ol’ Batch of Iso-Poop!
I’ve been really wanting to harvest my “Big Mama” isopod-worm hybrid bin system, and finally couldn’t resist doing so. I made a two part video featuring the harvesting process, and then the “reboot” of the system - but ended up deciding not to publish them (mainly due to length)…at least for now.
But that certainly doesn’t mean I can’t tell you about it!
I was really amazed in multiple ways…and have to say that the “math” doesn’t even make sense the more I think about it.
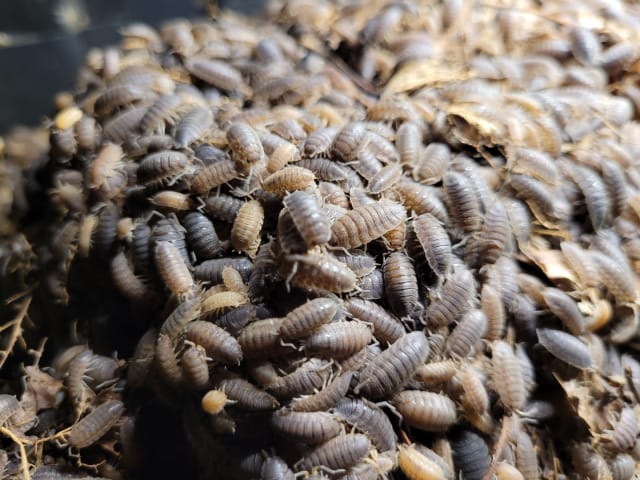
The isopod population in the system was even more insane than I realized. Clearly, a LOT of waste material had been converted into isopod biomass.
The amount of bulky, unprocessed “stuff” was also far more substantial than I realized. It’s now pretty obvious that isopods are far more effective at processing materials that are closer to the surface (and it makes sense). Once these materials end up somewhat buried, you just aren’t going to see the same level of breakdown.
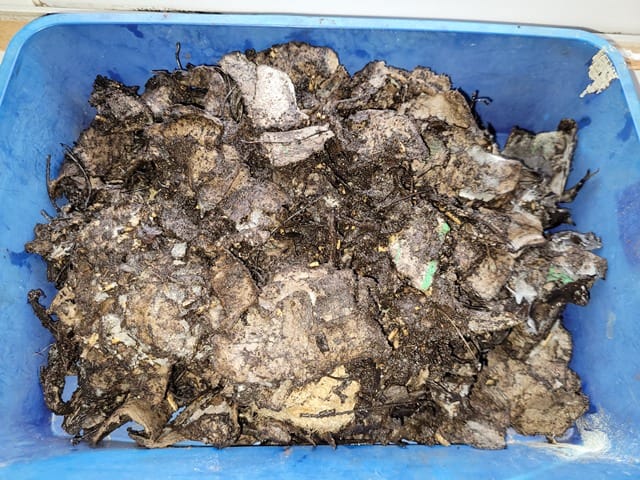
Somehow I still ended up with about 10 gal (38 L) ish of beautiful, screened iso-worm castings from this ONE (~ 17 gal / 64 L) tub. I’m still trying to wrap my head around how this is possible, given all the isopod biomass and bulky leftovers.
Whatever “black gold magic” is involved here (lol). I’m really excited to have so much of this material to work with now. It will really come in handy for potting mixes and, just generally, getting more plants going out in the garden!
And I was able to greatly boost isopod #’s in one of my iso-buckets and in a big backyard isopod system I have going as well (and have also rebooted the original bin) - so, I suspect that I will have plenty more of this compost available well before the end of the season!
----
I think I will leave it at that for today - but do stay tuned (and, as always, don’t hesitate to reply and let me know your thoughts, ask any questions you have etc).
Bentley
P.S. My friend John D (who alerted me about the topic of “rice water”) recently reminded me about another related topic I already had in the back of my mind…making “lactic acid bacterial serum” (LABS). What I didn’t realize was that it actually requires milk as a main ingredient. Given the current price of milk (almost as expensive as gas up here lol), I thought “not gonna happen”...but I realized that one batch of serum can actually last a long time, based on the dilution rates people are recommending. Heck, you can probably even make yourself some homemade cheese while you are at it (and don’t even get me started on the current price of cheese lol). Here is a video about it (plenty of others on YouTube as well, so I recommend digging around if this is a topic of interest).
Worm Greetings,
Back at the end of April I wrote about my “Creepy Pants” vermicomposter from many years ago (you can find that entry further down this page), mentioning that it was partially inspired by Amy Youngs’ “Digestive Table” worm composting art piece.
Well, Amy is still a subscriber - all these years later - and in one of her replies this spring she mentioned her “Worm Coffee Table” - a recent piece made for an exhibition in Dallas.
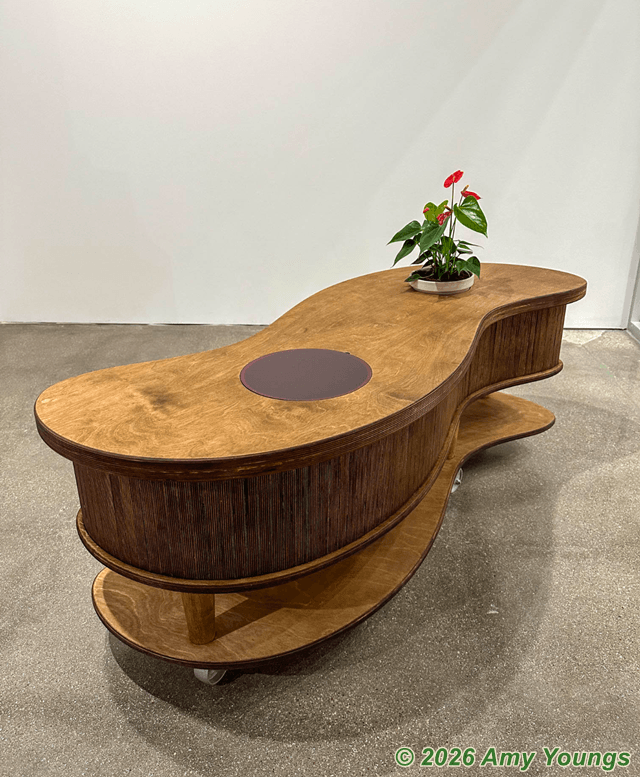
Some of the Highlights:
It was stained with a worm castings extract.
It features a red tinted window you can watch worms through (can also add food here).
It has a hole for a potted plant to sit in (where you can also add food).
Has coffee filters at the bottom that can be slid out to remove castings
It’s on wheels, making it easier to move around.
A water-based marine sealer was used on the interior walls to help protect them from decomposition.

I don’t think any serious “worm geek” could see this thing and not be impressed (and maybe a bit envious lol) - truly a work of art!
Thanks again, Amy, for sharing!
-------------------------------------------------------------------
I would be curious to know if anyone else has made some type of vermicomposting furniture! Weird and wacky systems in general?
Bentley
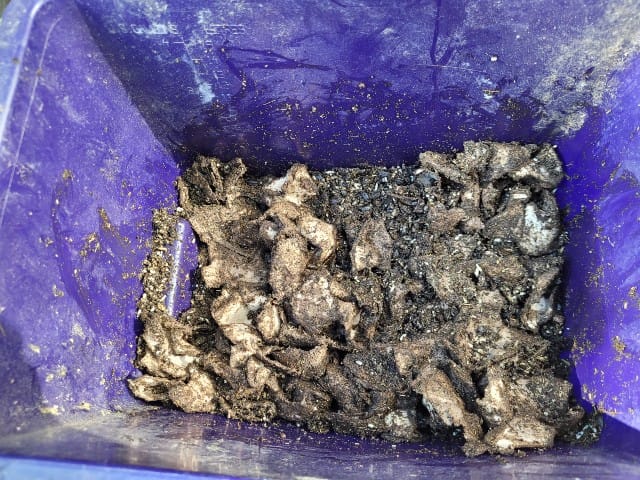
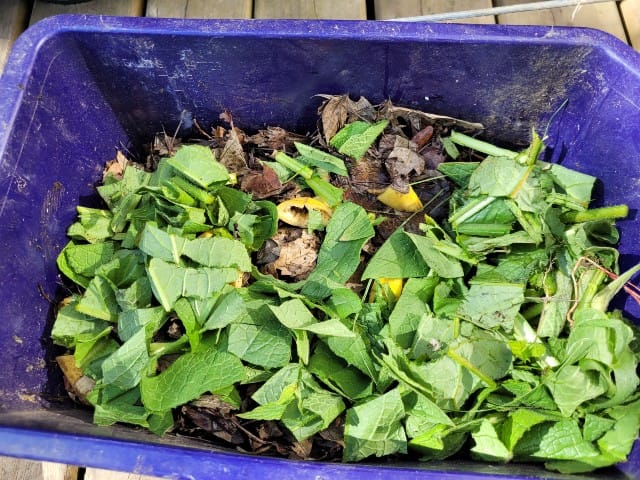
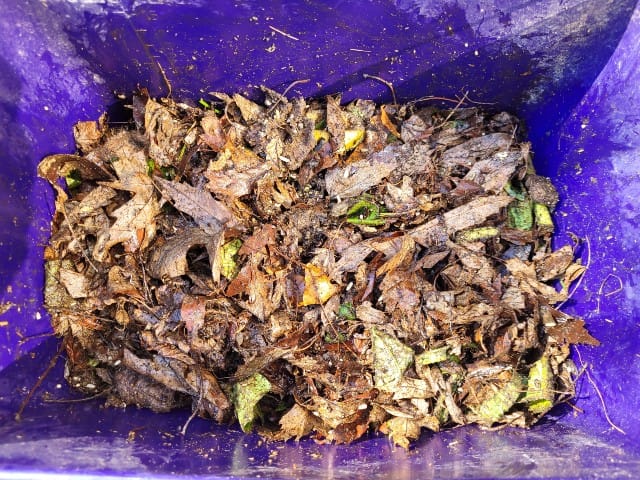
P.S. I recently did a mini “challenge” to see how quickly my isopods could munch down a “mountain” of leaves in my “Big Mama” system. Here are the (pathetically low quality as always) “BEFORE” and “AFTER” videos - with a timeline of maybe 6 days between them. Gives you a sense for what a big population of isopods can do to “browns” in a relatively short period of time. I have continued to add even more leaves to this bin in the meantime, and look forward to a pretty massive harvest of iso-worms castings from the system in the next week or two.
Hello again, Worm Friends!
One of the fun things about getting a bit more regular with my e-mails, is that it leads to interesting conversations, which can in turn lead me down interesting pathways I didn’t expect to head down - and to make interesting connections I didn’t expect to make!
So, thanks for your feedback!
An interesting connection I’m currently mulling over at the moment relates to my fermented carrots e-mail and this most recent rice water e-mail.
Someone replied to the carrots e-mail (excited to try them out), and happened to mention that he was fermenting old bird seed for 3 to 4 days and using it for a worm food mix (apparently very well-received).
I’ve actually been meaning to write about this idea ever since I had the exchange, and some of my rice water replies have pushed me over the edge! Haha
Someone shared that they have been testing out various liquid fertilizer recipes involving ingredients such as oatmeal, yeast, molasses, rice, and banana peels. Someone else shared a fairly recent video from Marty’s Garden relating to feeding worms oatmeal.
All of this really lit my brain on fire in terms of potential worm food supplement mixes one could make with a very basic (and relatively brief) fermentation process.
As vermicomposters we tend to view anaerobic processes as something to avoid - and that is still the case as far as our systems go - but more and more I am realizing there are some interesting possibilities on the “worm food” side of things.
A while back, one of my worm farming friends shared that he was having good success feeding corn silage to his worms.
I myself tested out a food mix made with bokashi drainage liquid (along with bedding and living material) and the worms seemed to love it!
And now these more recent bits and pieces make me think I should be experimenting with all of this some more!
I think fermentation can unlock nutrients in different ways (maybe more efficiently, I dunno) that aerobic decomposition. E.g. I’ve heard that sauerkraut can be richer in available nutrients than the cabbage it is made from.
Anyway…as you can probably tell, this is all just speculation at the moment.
It did inspire me to get a little experiment set up though!
I happen to have a LOT of sunflower seeds (that have been sitting around for at least a few years), and was able to find some old bags of rice - so I thought it would be fun to do a basic ferment in one of my bubbler jars.
Normally, sunflowers need to germinate in order for the worms to get any benefit from them, but I’m curious if the fermentation process might help to break them down a bit more?
Will be interesting - and I will keep everyone posted!
Bentley
P.S. I’m already thinking about other possibilities, such as comfrey - maybe a faster way to make a sort of “homemade manure” (livestock manure is made in a pretty anaerobic environment - in the animal digestive system - after all)! Think I would need a bigger vessel (and something not also used for food lol) for that one!
Worm Greetings!
A recent e-mail from looong-time RWC subscriber (and Dad-joke sharing friend), John D, introduced me to something I (embarrassingly?) hadn’t heard about - the idea of adding rice water, even cooked rice, to soil - possibly even worm bins - as a sort of miracle booster.
Right off the bat, I was skeptical - and the first few videos I encountered on YouTube did nothing to instill confidence in me. They had a very distinct “AI” vibe about them - with stock images, and cheesy fake narration…and the content itself felt pretty basic and repetitive.
But then I found a video from Marty’s Garden relating to the topic.
How Rice Water TRANSFORMED My Garden Into a Living System
Marty is someone I respect a lot, and I have no doubt that many subscribers will be familiar with him as well. So, I was definitely a lot more open to listening to what he had to say about it.
Backtracking a bit here…
Something that came to mind right away when I got the email from my friend was arsenic. There has been a fair bit of fuss about the tendency of rice plants to accumulate this harmful element - and the potential for it to reach toxic levels, especially for people that use rice as a staple part of their diet.
My understanding was that washing rice could actually help reduce arsenic levels (and who knows what else that might be in the rice dust), so I haven't been viewing the milky rinse liquid as any sort of asset (quite the opposite).
Digging into this a bit more, I’m not really sure it’s as much of a big deal as I thought (but I am certainly open to any additional input from readers who have spent more time researching this than I have).
In terms of the potential value of rice water - I can see how it might stimulate microbial activity, which in turn could stimulate worm activity. It's pretty obvious that it contains a fair amount of starch (and likely other things?) just by the look of it.
In a sense, its use reminds me of adding various sugar-based amendments to compost teas to help boost the microbial population - but in this case you are just adding it straight into the system (soil, worm bin etc) itself, which to me almost seems less risky - at least if done in moderation.
That’s actually something Marty, and even the lame AI garden gurus, emphasize as well.
As far as actually using rice itself…I’d probably be a bit more cautious about this…but maybe that’s just a trauma response stemming from one of my earliest vermicomposting nightmares - hahaha.
If you're not familiar with the story...
I nearly killed off my very first population of Red Worms - kindly given to me by a co-worker waaaay back in early 2000 - by adding a partial pot of cooked rice to a very small worm bin.
It heated up, turned into a fermented anaerobic goo, and I ended up with so many white worms (aka pot worms) that they were literally oozing out from the air holes.
Good times!
Anywho…
I’d love to hear from anyone that has played around with rice water (or anything similar). This makes me want to do some experimenting!
What about something like chickpea flour in water? Hmmm…
Thanks again to John D for putting this on my radar screen.
Talk more soon
Bentley
Hello hello!
Right off the bat I will admit this e-mail has absolutely nothing to do with worms - well, other than maybe the fact that I have plans to grow my own carrots this season (and composting worms are always involved in my gardening efforts in one way or another) - so feel free to ignore this one if worm content is all you are interested in!
Back in the fall of 2020 I finally “discovered” the wonderful world of fermentation. It started with kombucha, but led to hard cider and a variety of fermented foods. I was shocked by how easy, inexpensive, and fast most of the ferments were - and kicked myself for not giving it a try a long time ago.
On the food side, it was fermented carrots that really stood out (a variety of other fermented veggie attempts were definitely a bit more 'hit and miss')! It was easy (and cheap) prep, a fast process, and the end product was consistently great!
That said, it’s important to note that fermented foods aren’t necessarily everyone’s cup of tea. I happen to be someone who grew up absolutely loving dill pickles - especially the “sour” deli ones - something that has continued to this day. I’m a huge sauerkraut fan (and have managed to make some semi-decent batches, but find it to be a lot more of a pain).
Assuming you haven’t already tested the waters with (tasting) these types of foods, a decent indicator of whether or not you will like them is how much you like pickled vegetables (or other pickled things for that matter).
One of the real clinchers for these carrots is their texture - they consistently end up with at least some crunch. So, if you really don’t like the “mushy” mouthfeel of some other fermented/pickled foods, this may be the one to try!
Anyway - that’s more than enough lead-in! Let’s chat about how I make these things.
I will admit that there is some “game changer” equipment involved in my version - nothing too crazy just large half gal mason jars, and what are known as “Easy Fermenter Lids” (my little kit came with 3 lids and a little vacuum pump thing). There are plenty of other lid options out there (e.g. different types of “bubbler” lids etc)...or, if you’re willing to be attentive, even old-school “burping” can get the job done.
But releasing all that CO2 from the fermentation process is going to be very important so that pressure doesn’t build up too much.
I use a basic 2.8% salt brine - easily made by dissolving 28 g of coarse salt in 1 liter of water (I age tap water in bottles for a variety of uses, and just use this since it is room temperature and free of chlorine). I find that volume to be near perfect for one of my big mason jars stuffed full of carrot sticks.
The carrots alone would likely provide you with a decent product, but I always like having other flavor agents in the mix, such as onions, dill or jalapeno peppers (I always have onions on hand - so they tend to be my go-to choice - I absolutely love using dill when I have it, though) . These other ingredients should go down in the bottom so as to reduce the chance of “floaters”. This is another great thing about the carrot sticks - you can stack them in these jars like cordwood, so they won’t budge.
My carrot prep involves peeling them and cutting them into long sticks (usually about 4 or 5 per big carrot). If you have really long carrots you may need to cut your sticks in half as well (especially if you are using smaller jars than mine). As I alluded to, you don’t want anything up on the surface or sitting above the brine.
I can usually get a full 2 lb bag of carrots (plus extras) into one of these jars (obviously taking into consideration that they have been peeled and ends cut off). Once in a while the grocery store I usually go to has these crazy sales where the 2 lb bags of carrots are 99 cents (they always seem to sell 2 lb of onions for the same amount during these sales, so it works out nicely).
But even at the current $3.88 price (which I actually refuse to pay lol) that is an absolute bargain! A quick search for any sort of quality fermented vegetable product - usually in much smaller jars - will reveal just how expensive this stuff can be if you actually buy it from a store or even farmers market.
Getting back to the set up process…
Once your carrot sticks are all jammed in there and your brine is poured in (leaving a bit of air space at the top), put the lid on (and suck out extra air if you have the little pump thing) - and simply leave it sit at room temperature for about 7 days!
NOTE: once you have some batches under your belt, you can pour a little bit of active brine from a previous batch into new batches - but these lacto bacteria are everywhere, so it’s not critically important.
That’s basically it!
You will know you are on the right track of the liquid in your jar has become somewhat cloudy. Here is my most recent jar (ready tomorrow, as I type this - whoo!):
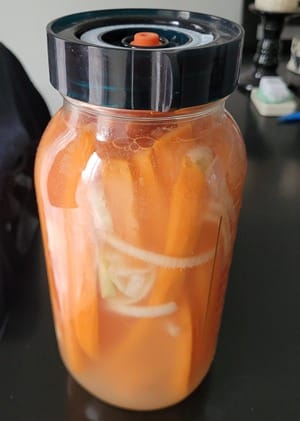
Once the 7 days are up, the entire jar (with lid) can go into your fridge. I do like to keep the fermenter lid on, since the fermentation process can continue slowly even at low temps, but a regular mason jar lid should work fine if you are regularly opening it (and trust me - if you like fermented veggies, you will be opening your jar a lot hahaha!)
There has been a lot of evidence to suggest that fermented foods are very good for you. Obviously, you do need to keep the sodium levels in mind (don’t go too crazy, especially if you are less active, on a salt-reduced diet etc).
This is in no way, shape or form “health advice” - just something that makes me happy because I love these things so much!
-----------------------------
I will leave it at that for today!
But I would love to hear from the fermenters among you (and of course anyone with questions etc)! What are you making? Has anyone out there mastered the art of making a crunchy, sour dill pickle (my ultimate goal)? Other tasty fermented veggies you can recommend?
I am definitely thinking about attempting fermented asparagus again this year - but this is one where you can go wrong on the texture front, so I'm not 100% commited yet!
Talk more soon
Bentley “Fermentley” Christie
Compost Guy Resources
Hello Worm Friends,
I was reminded about a major “hot topic” in vermicomposting when someone told me about some bad behavior in the RWC Facebook group a little while ago. The post in question involved someone innocently asking about the value of using system drainage liquid (aka “leachate”) as a sort of “tea”.
As is often the case with this topic, most of the opinions seemed to be clearly on one side of the fence or the other - and tensions between the two groups were escalating quickly (hence the report about “bad behavior”).
I’ve always tended to view the topic the way I view most worm composting topics - with an appreciation for the term “it depends”! Almost nothing is set in stone in this quirky field of endeavor - and it’s always important to remember that!
That said, my boilerplate stance relating to leachates is basically:
These liquids can be used in various ways, but caution is always warranted.
They can contain phytotoxic (plant harmful) compounds - potentially even pathogens.
BUT the maturity of your system can have a major impact on the overall “quality” and potential for hazards.
A well-maintained system often has little to no leachate, and I don’t feel that running water through a system is a good way to produce a good quality tea, regardless of system maturity.
I always encourage people to focus on producing top notch worm castings first and foremost - and then to just make teas or extracts using those!
Diluted leachate, especially from a mature system, should be fine to use in outdoor gardens or compost bins, but you may want to steer clear of edible plants. If the parent liquid has any sort of foul odor even more caution is warranted.
There is a LOT that can be said about making actual teas and extracts - and perhaps we will explore this some more in future e-mails - but today I did want to share an incredibly simple approach for making a DIY extract.
Before we get to that, it’s important to note that even just the WORDS you use can cause a lot of issues…(yet another common vermicomposting challenge in general)
Just so everyone is clear here - when I say “tea” I am referring to a type of liquid extract that is “brewed” using vigorous oxygenation and the addition of various amendments to help boost the population of beneficial microorganisms. It needs to be used very soon after brewing so as to avoid having it go anaerobic.
Basic extracts on the other hand are really just a liquified version of castings/compost - without the vigorous aeration (although they can be aerated once made to help keep them aerobic) or the microbe food amendments.
Those who are really serious about extracts use actual “extractors” - fancy machines that basically help to separate a lot more of the valuable microorganisms from the solids, and get them into the liquid - but the good news is that there are plenty of ways to keep things super simple with extracts.
The simplicity of basic extracts has always really appealed to me - and I think I have only ever attempted an actual “castings tea” 2 or 3 times at the most.
That said, it is worth noting that I have used “tea” more as the generic term for ALL liquid extracts in the past.
[Important Lesson - Always make sure you are clear on what exactly someone is referring to when they say either “tea” or “extract”.]
Part of why I mention this is because I want to share some of the little projects I have written about on the Red Worm Composting blog - but I will save that for upcoming e-mails.
Let’s now look at my dead simple way to make your own extract!
All you need is:
5 gal bucket
Some compost (ideally 1-2 lb of ‘worm-worked’ material)
Rain water or some other de-chlorinated water source
Any type of mixing tool
A small-ish plastic pot with holes in the ¼ to ½ inch range
If you DO happen to have a compost tea bag in the 400-600 micron mesh range (or even a burlap bag - if using the plastic pot pouring method I will describe in a minute) that’s great, but not mandatory!
Let’s actually address the “bag” side of things right off the bat. It’s important to note that extracting the chemical components of compost (nutrients, humic acids etc) is fairly easy. Any sort of porous bag will likely get the job done.
As I learned from a Soil Foodweb specialist friend, it is a different story when it comes to the biology in the compost. I had always assumed that something like a pillow case or nylon stockings, or cotton bags would have openings big enough to let microorganisms through - but apparently that’s not the case (for larger microbes anyway).
400 microns seems to be the number you should be aiming for - which is definitely bigger than the openings in the types of bags I mentioned above. There are some paint strainer bags out there that seem to be in this range. Apart from that, you may be best to just buy a proper compost tea bag (if you wanna get a bit more serious about this stuff).
Some of you will naturally ask (as I did) - “how big is ‘too big’?”
The good news is that this depends largely on how you plan to spray/pour your extract.
Any sort of actual sprayer…or even a lot of watering cans…can get plugged up fairly easily when a lot more material ends up in the extract. This is where my “plastic pot” method comes in handy (if you plan to work with really unfiltered stuff).
Basic Instructions:
Fill your bucket with water.
Dump in your compost (or put it in your bag)
Use your mixing tool to gently mix everything up
OR immerse your bag in the bucket and gently dunk and massage it in the water repeatedly
The more you mix - the more good stuff you will end up with. Just don’t use any sort of power mixer since this can damage the biology.
Once you have a rich looking extract, take your bucket (and pot) over to where you want to use it.
Use the pot as your make-shift “watering can” - dunking it in the bucket and then letting the contents drain out onto your garden.
A decent drench is helpful for getting all that goodness down into the root zone - but do keep in mind that a “little goes a long way” when it comes to castings.
Don’t forget all that awesome leftover material as well - it can be added as a sort of “vermi-mulch” around the base of your plants.
I recently used this method to treat my asparagus patch as the new shoots were starting to emerge. Ideally, I probably should have done this earlier in the season, but nevertheless it’s already looking like I am going to end up with a bumper crop this year!
I will leave it at that for now - but I would love to hear from those of you who use teas and extracts!
Bentley
P.S. My first batch of seedlings is now out in the garden in a tiny make-shift “greenhouse” I made using old parts from Worm Inn stands lol! Definitely getting more and more excited about this gardening season!
Compost Guy Resources
Just a very quick PSA about some of my older content - there is a decent chance that some of the resources I talk about in old blog posts don't exist anymore, and that some of the links don't lead anywhere (or worse). Unfortunately, I just haven't had the time to go back through these older posts on the RWC website to get this stuff updated.
Someone asked about the "EcoSherpa" blog I mentioned (and maybe even linked to) in at least one of the blog posts I shared recently. This was my first "eco" blog (started up with a friend), where I wrote about all manner of environmental topics, including worm composting. My friend ended up taking it over, but unfortunately didn't even keep it online (let alone develop it further) - so I have no idea who owns it now, and I don't recommend trying to visit it.
The original "Compost Guy" blog is another really old resource that has lots of broken links. Thankfully, I am at least still in control of that one - but once again, I just haven't had the chance to go back through all the blog posts and pages to make sure I only have legit links etc.
The good news is that Amy Youngs original website (featuring the Digestive Table) is still online, so don't hesitate to visit that!
Nostalgia is fun...but yeah, it can be a reminder of the fact that not everything stays the same online!
Bentley
Compost Guy Resources
Hello again, Worm Friends!
I have a weird “gift”. You might call it a very mild version of clairvoyance. Pretty well every time I have the urge to do a “blast from the past” type of e-mail or post, it just so happens I am very close to some sort of anniversary of the “blast” in question.
As I just discovered, tomorrow (Apr 25, 2026) marks the 18 year anniversary of my original Creepy Pants Vermicomposter blog post! All week I’ve been thinking it would be great to revisit that story.
And here we are.
Back in the spring of 2008 I got it in my head that I should "invent" a worm composting system…using pants.
An old pair of jeans, to be exact.
I had been inspired by an Australian continuous-flow bag system (first of its kind) called the “Worm Swag”, as well as an environmental art piece, designed by Amy Youngs, known as the “Digestive Table”.
The system itself wasn’t particularly successful. The pants ended up stained and moldy, and the contents dried out more than what is ideal for a worm bin…
…yet the project still managed to provide some inspiration, not only for myself, but - much more importantly - for someone named Robyn Crispe…who ended up creating a system called “The Worm Inn”...which ultimately helped inspire Steve Churchill to create “The Urban Worm Bag” (and no doubt had a role in Tom Perkins’ creation of the “Vermibag” as well)
Every time I feel like I haven’t done anything important in life…all I have to do is remind myself about those moldy, stained pants.
I’m mostly kidding around - but I do take some pride in the fact that my hare-brained, vermi-shenanighans have had a positive impact on quite a few people (thanks again to those of you who have been writing in lately to remind me)!
That's all I've got for for today.
Bentley “Vermi-Influencer” Christie
P.S. One of the people that recently got in touch with me was in fact Amy Youngs (of Digestive Table fame) - and she actually has a really cool new art piece involving worms that I will write more about soon!
P.P.S. I have created a brand new [RWC] e-mail archive, so you now have a spot where my (recent-ish, at time of publishing this) messages are all in one place. If you are reading this, you made it to the archive - congrats!
Compost Guy Resources
Hello again, Worm Friends!
Getting back to my gardening efforts (if you missed the e-mail, I’ve decided to finally ramp up my backyard food production again, after years of putting in a pretty “ho hum” effort)...
Obviously, when you are starting from seed…and it’s already this far into the season (still not too bad for southern Ontario, though)...procrastination is not an option!
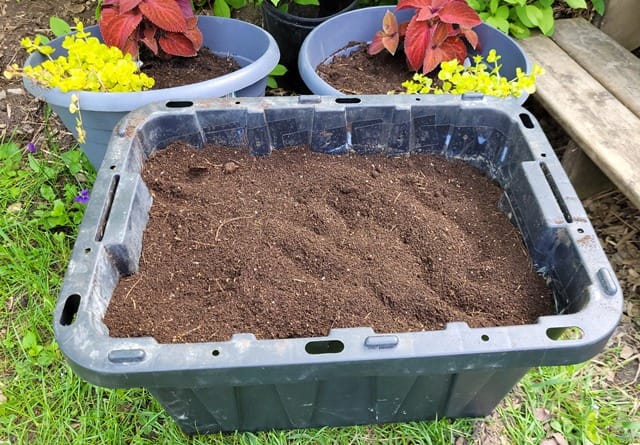
One little “bonus” for me this year was that I have a pretty nice supply of isopod “castings” already harvested and screened. To be clear, this stuff may have been “kissed” by a Red Worm or two (lol), but I’m not super confident it has been worked over to the point of being what I would consider “iso-worm castings” (the stuff I end up getting from my bigger system should fall into this category - and I look forward to testing it out later in the spring).
The isopoo is a really interesting material - reminds me a lot of peat moss, but it undoubtedly offers more in the way of nutrition. Still, I felt it was probably a good idea not to go too crazy with it.
I happened to have an old bag of “potting soil” (which is a misleading term since this is the heavy, cheap stuff I get from a local grocery store) sitting out on my driveway, so I figured I would put it to good (?) use.
[As a funny side-note, which ties in with our little “Red Worms and soil” chat the other day, I found multiple little wigglers in the material - clearly, it was at least a bit of an “upgrade” for them as compared to the surrounding environment.]
For my mix, I settled on approximately ⅔ potting mix, ⅓ isopoo. This would be on the high end for worm castings, especially for a seed starting mix - but again, this is a somewhat different material for sure, and I really want to put it through the paces to see how it performs.
My first little set of seeds to start are:
Snap peas
Beets (“Chioggia”)
Lacinato kale
Lettuce (“Little Gem”)
So far, so good!
All of these have started coming up already - and trust me when I say that neither this bagged “potting mix” (I am using in current mix), alone, or the usual ‘frankenstein’ (mishmash of different inputs) seedling mixes I end up using, tends to work out as well as what I am seeing.
We shall see how things progress from here!
Bentley
P.S. Any carrot-growing experts out there? This is one crop I have almost never attempted to grow, since it just seems like a bit of a pain in the neck (and because carrots tend to be fairly inexpensive). This season I am committed to making a real effort to grow my own - partially because I make a lot of fermented carrots (something I will write about another time), and partially because even carrots are getting expensive. Actually, another big reason is that I know these will taste much better than anything I can get from the store. Anyway - I’d love to get some advice about the best way to grow them!
Compost Guy Resources
Hello Worm Friends
It has been great reconnecting with subscribers recently. Thanks again to those of you who have been sharing your thoughts, asking questions, or just saying hello!
Last broadcast, we looked at the topic of “Worm Towers”. I shared that I have a much broader definition of the term and that, in fact, I’ve never actually had much faith in the original concept.
One reply that came in made me realize I probably shouldn’t even be using the term “Worm Towers” at all. The word “tower” naturally suggests a structure that extends above ground level. While there are some hybrid in-ground systems (I would happily use) that would technically align with this description, the in-ground bucket/bin systems I regularly recommend aren’t really “towers” at all.
Not only is there no real need for them to be elevated much above soil level, there are actual perks to keeping them deeper (basically so the lid is at or just above soil level). You end up with better protection from the elements, plus it is much easier to keep the systems hidden from view (let’s face it - a bunch of plastic buckets sticking out of the ground might not be the most appealing visual).
Another question on the mind of more than one subscriber related to overwintering. Basically, how protective are these systems and what (if anything) needs to be done at the end of the season in regions with cold winters?
The short answer is that even a fairly small in-ground bucket can offer far more protection than any sort of above-ground bin (especially if you heap on a bunch of bedding materials in the fall).
It is very important to consider how/where the system is being used, though. If it is serving as an in-garden “fertility station”, there’s a good chance it’s going to be pretty run down by the end of the season thanks to all those greedy roots from nearby plants.
My quick and dirty advice relating to this is that unless you reset the bucket in the fall, you will likely be better off simply dumping it into a larger outdoor system (ideally, one with an in-ground zone as well).
As a sidenote, this actually highlights a key part of my overall worm composting philosophy these days. While I always recommend starting small (much better than not starting at all), working towards having an “ecosystem” of different systems operating at the same time can really help to take your worm composting efforts to the next level.
You will almost always have a source of “living material”, you will almost always have some place to put your waste materials, and you will almost always have a place to transfer materials/worms from other systems.
Location is another very important consideration, both in terms of overall viability of this approach as well as overwintering potential.
Sadly, some locations just don’t really work for in-ground vermicomposting (or they are at least much more challenging). Very arid regions, especially with really sandy soils won’t be remotely the same as temperate regions that receive a lot more precipitation. Regions with extremely cold winters (permafrost etc) will be very different than milder regions. Etc
Maybe I’m stating the obvious here - but sometimes it’s important! Lol
For perspective, I live in a region that is in the Zone 5 (ish) range. We get plenty of precipitation (but not excessive - and there can be extended dry spells). My soil is quite dense - plenty of clay, although all my outdoor composting efforts over the years have helped to make it more loamy.
If you live in an extremely rocky region - especially one with only a thin layer of soil - that’s obviously going to create some challenges as well.
One last point before I sign off today…
I referred to Worm Towers (the original concept) as “glorified feeding stations”. I definitely didn’t mean to imply that there is no value in the “feeding stations” concept. I was simply pointing out that these PVC tubes offer limited value as actual worm composting systems.
Where I see the “feeding stations” idea tying in nicely is with this “bigger picture” model of vermicomposting I touched on earlier. In a yard like mine - where I’ve been vermicomposting for 20 years or more, with many different systems - there is always going to be a resident population of Red Worms, no matter how active I am during a particular season.
Red Worms (and composting worms in general) are extremely talented at surviving and adapting to less favorable conditions. This statement alone opens up other “cans of worms” (such as “invasive earthworms”) - which I really can’t get into today lol - but the key take-away is that there are cases where you can have a lot of composting worms just hanging out…not “living their best life”...just hanging tight until conditions and opportunities improve.
Something like “feeding stations” can serve as a sort of lifeline for these worms - drawing them in and concentrating them.
Different idea than an actual in-ground bucket system - but still a neat strategy in certain cases where your composting worms have ended up a bit more scattered on your property.
Anyway - I think I had better leave it at that for today, but there will definitely be more to say on the topic of “vermigardening” in the days ahead.
As always, don’t hesitate to share your thoughts or questions at any point along the way!
Bentley
P.S. I wanted to also share another page I created relating to in-ground bucket systems. It includes a video (pretty sure it features the system I wrote about in the blog post I shared last time).
Compost Guy Resources
Hello Vermi-Friends!
In my last group broadcast I wrote about my keen interest in getting more serious about my gardening efforts this season. It is hard to beat the cost savings and health benefits of “growing your own” - especially in this day and age.
I received some interesting replies from readers (thank-you!), and certainly welcome more if you feel so inclined to share what you are up to in the garden.
Today, I want to start chatting a bit about integrated vermicomposting - or “vermigardening” if you prefer. Definitely one of my favorite topics in the whole wide world!
It was my ill-fated restaurant food waste composting project (in a modest suburban yard) that led to my “accidental” discovery of vermicomposting trenches - which not only completely changed the way I looked at vermicomposting, but which also quickly made me “good at” gardening for the first time ever. Lol
These serious in-ground systems like trenches and pits are amazing - and I highly recommend them for anyone with the space, resources, and physical prowess (lol) to make them happen…but for many people, something a bit more low-key is usually going to make more sense.
This is where “Worm Towers” can really shine!
Firstly, I need to be very clear that MY definition of this term is considerably broader than that of the original “Worm Tower” concept - and, in fact, that I never really felt the original concept made all that much sense.
If you’re not familiar - the idea was that you would use 4” PVC pipes with lots of holes in the sides, as a sort of in-ground worm composting system.
For the record, I was happy to put my initial skepticism aside, and I fully tested these things out.
My conclusion was exactly as predicted. 4" PVC pipes are indeed way too small for effective vermicomposting, they offer virtually no protection for the worms, and they are just plain ugly.
Another major issue (which maybe helps to explain the original design) was this idea that it was really just a glorified feeding station - and that the worms would actually be doing a lot of valuable work out in the adjacent gardening soil.
I won’t debate for a second that composting worms can survive in soil - even potentially “thrive” on some level if the right conditions/resources are present. But this idea that they are providing the same benefits as more typical soil earthworms is nonsense.
They are waste processing super heroes - not earth workers!
Mini rants aside - there is some “genius” in the concept itself.
A system in the soil that helps composting worms thrive - it makes total sense!
Really, the main “secret to success” involves making these things bigger and, ideally, more contained. A super easy way to do this is to simply use an actual container (mind-blowing, I know lol).
If you want to get really serious, something like a plastic garbage bin can work well…but it also takes up a lot of room (in my mind, these would be much better suited for something like pet poop vermicomposting).
For most people, I think a basic 5 gallon (ish) pail is a much better option! They are super cheap, very easy to move, very effective…and they don’t take up nearly as much space!
Here is a blog post I wrote about this topic in case you want to learn more:
Basic In-Ground Bucket Worm Bin
I will leave it at that for today - but will likely have more to say about (somewhat compact) integrated vermicomposting soon!
I’d love to hear from anyone who has worked with integrated systems - or who just generally has an interest in the topic as a whole.
Bentley
Compost Guy Resources
Hello Worm Friends,
These are interesting times, I tell ya!
I dunno about you, but looking at the price of food in the store these days definitely makes my eyes water. I’m not even talking about “organic” - I’m just talking about...food. lol
So yeah, it has me feeling like I should really start getting serious about my gardening again, by golly!
Every year I have some form of “garden”...but in recent years (ok let’s face it - for quite a few years) it has been very low-key in the effort department. I am blessed with plenty of “volunteer” crops that continue to pop up. I’ve always been a bit of a “potato guy”, and they are great for continuing to come up as well.
My 87 year old dad is a saint - every season (never fails) - he takes pity on me and shows up with some actual starter plants to put in as well.
So, yeah - I grow some "food" every season.
But, I’m feeling like it might be time to relive my “glory days”!
Back when I had some serious vermicomposting trenches (and other integrated systems) going. Back when I actually planned things out and got started somewhat early (keep in mind I am in Canada - I’ve still got a bit of time here lol)
Here are a few pics just to prove I’m not fibbing:
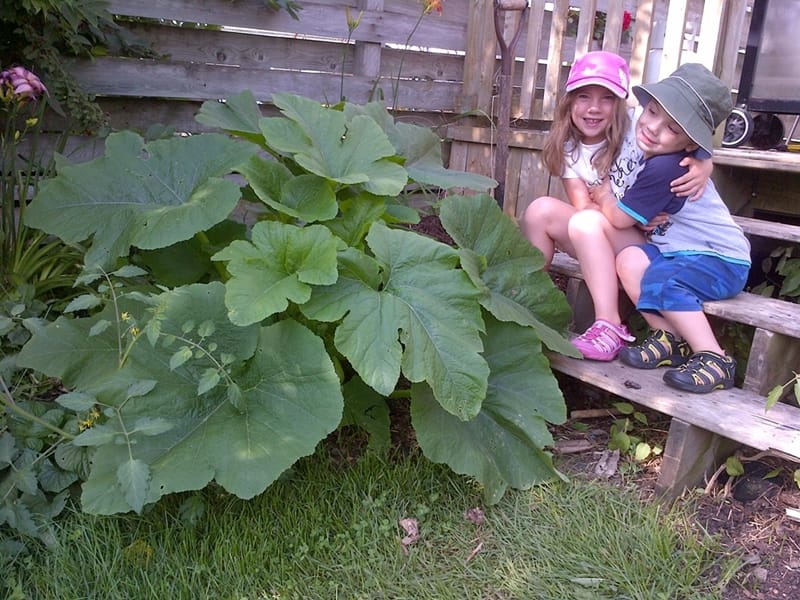
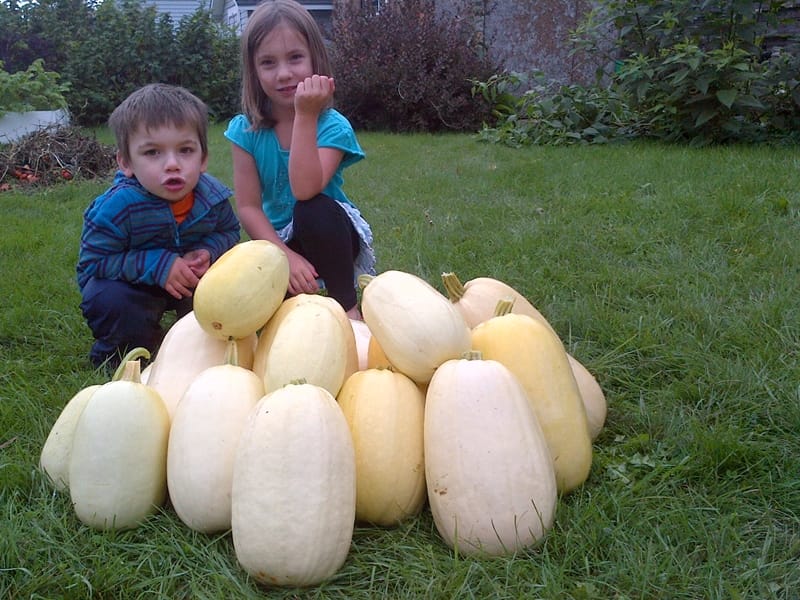
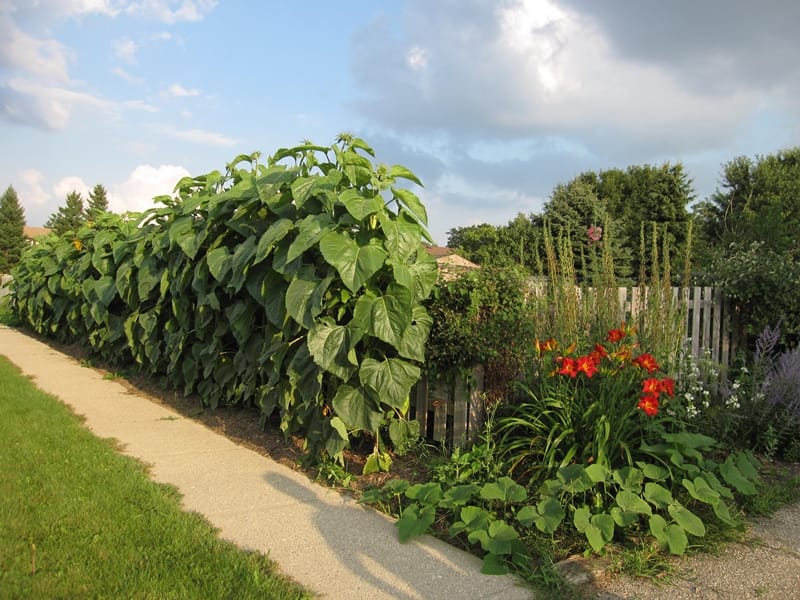
(My daughter is almost 19 - finishing up first year university - and my son is 15...just for some chronological perspective LOL)
Gardening is good for your soul (and of course, health) - that much I know for sure - but these days it is also especially good for your pocket book!
So - I would love to hear from all of you food gardeners!
What are your go-to crops? What do you have planned (I’m sure well underway for those of you in warmer regions)?
I definitely want to dive back into the topic of “vermi-gardening” in the weeks ahead as well. I know from experience how effective integrated systems can be for helping a gardening hack like myself (so I can only imagine how well this stuff works for real gardening pros).
Looking forward to being “schooled” - and to getting things rolling in a big way!
Bentley “Out of Practice Green Thumb” Christie
P.S. As an unrelated sidenote, I recently released my first (public) YouTube video in more than 5 years (crazy, right?) - featuring my Big Mama Isopod-Worm Bin. It’s so basic and low quality (especially these days) - but I think I have just reached the point in life where I am saying “why not?” more often (still not often enough)! I plan to release some more of these ridiculously basic, unfancy clunkers in the weeks ahead. I am still waiting for some “haters” to show up - but so far the comments have been really nice! LOL
Compost Guy Resources
Worm Greetings!
I got outside for some overdue yard work yesterday. I’ve been dreading it. The exact same way I dread it every, single year, once spring finally settles in (and there’s no more hope of random blankets of snow covering up my fall “best efforts”).
It was sunny - and likely less than 10 C (50 F), but it wasn’t long before it felt like…paradise.
I always smile when I think about this stuff after the fact. Sunshine. Fresh air. Some light physical labour. A sense of accomplishment. How on earth do I convince myself this is something I need to avoid?
It’s a mystery.
I dragged my son out with me. He’s 15 now, and definitely needs to develop a stronger appreciation of this type of “hard work”. Like most parents, I feel like I had a greater appreciation of “hard work” when I was his age. Also like most parents, I’m probably full of crap.
As expected, he was miserable when we first got out there. “HOW long do we need to be out here?” “WHAT exactly are we out here for?” “WHEN will it be done?”
Maybe not word for word quotes - but not far off.
I’m not a lecturer per se…but I will admit to giving him some lectures - lol.
What’s great is that he too experienced a positive shift once he got focused on some specific tasks I had assigned - even reaching the point of actually apologizing for being a bit crabby earlier.
So what’s the point of this long-winded lead in? I’m not really sure. Maybe that even small, simple things can make a big difference if you give them a chance - or that sometimes (as often as you can) it’s a good idea to ignore that nagging, negative voice in your head and just do what needs to be done.
But I digress…this wasn’t meant to be a self-help piece lol. What actually inspired it was of course grass thatch!
Seeing the growing pile of thatch as I raked my lawn, I was reminded of the fact that this is a pretty interesting material - one that doesn’t sit rigidly in any one category. It has some food value, it has some bedding value…even some value as a living material, believe it or not. Yet it’s not something most people would think to add to a vermicomposting system (especially not a worm bin).
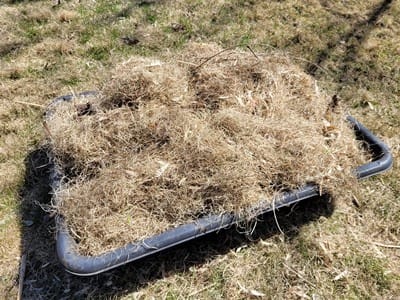
Just in case anyone isn’t familiar with the term “thatch” - this basically just refers (primarily) to the dead grass that accumulates on a lawn over time. Naturally, it can include any number of other components - depending on what else has fallen onto - or been added to - your lawn.
It’s also important to point out that the timing of your thatch harvest can make a big difference in terms of the type of material you end up with.
My “early spring” (here in Ontario) collection was almost entirely dead grass, and other debris that happened to be on the lawn (e.g. dead maple keys). Raking later in the spring would undoubtedly yield a higher proportion of green grass - giving it more “food” value.
Just something to keep in mind.
Thatch Usage & Caveats
Lots of thatch can be used as-is, but if you want to age/enhance it a bit, I suggest putting it in some type of plastic bin (lightly moistening it first if it is very dry) - even a plastic bag would work - and leaving it to sit for a week or two (definitely no harm in leaving it longer, though). At this point, it will be even more of a “living” habitat material, and your worms should love it.
You can add it, along with more typical bedding during a new system set-up (2 parts bedding to 1 part thatch should work well), or simply add it as a cover material in an active system.
Hopefully it goes without saying that thatch from lawns where pesticides - or inorganic fertilizers (any time recently) - have been applied, shouldn’t be used for vermicomposting.
It’s probably important to also establish that thatch and actual grass clippings are very different materials. The latter, while offering plenty of potential as a “green” in outdoor systems, should be treated with a lot more caution.
I will leave it at that for today.
Don’t hesitate to let me know if you have any questions, or experiences to share. I always love hearing from readers!
Bentley
P.S. After my last “living material” e-mail, a really good question came in relating to the viability of microbes in material sitting outdoors, exposed to harsh winter conditions (i.e. does this basically “sterilize” the material). I don’t have a definitive answer, but what I do know is that microorganisms definitely have strategies for surviving severe conditions - typically some form of protective resting stage. My hunch is that it is all in the lead time, prior to exposure. If you toss compost straight into a chest freezer, for example, my guess is that would have a pretty devastating impact on the microbial community. If materials have been sitting outdoors as temperatures start to drop in the fall, it seems much more likely that they will have the chance to properly prepare for winter conditions - although, just how severe the conditions are, and how exposed the material is, both likely have a major influence.
Compost Guy Resources
Hello, Worm Friends!
If you’ve followed Red Worm Composting for any length of time, you’ll likely know that I have partnered with other people in the industry as a way to help support my work, while ensuring my followers end up connected with other great products/suppliers/educators in the worm world.
One such supplier…and colleague…and good friend (gosh darn it) is Steve Churchill, of Urban Worm Company fame.
I would be surprised if anyone reading this hasn’t heard of Steve (or Urban Worm Company / Urban Worm Bags) by this point. Since 2014, when he launched the Urban Worm Company blog, he has absolutely skyrocketed to the top of the worm world and, let’s face it, put most of the rest of us to shame. Lol
What’s funny is I’ve always liked to think that I played some small role in Steve’s (early) journey, and he has said some nice things to support that idea over the years…BUT, looking back at the first official e-mail I received from him (April 2014), it looks like I didn’t even respond!
(It was an accident, Steve - I just didn’t see it!! I swear! lol)
OK, kidding aside - Steve joined the Worm Farming Alliance a short time after that, and our connection grew pretty quickly from there (he is actually now a managing partner of the WFA).
I sold his Urban Worm Bag on the Red Worm Website for many years…
…but weirdly we haven’t really done much in the way of collaboration (for the record, Steve has been trying hard to get me to attend conferences - or even just to hop on a call - for years - unsuccessfully…so this is definitely a “me” thing lol)
Anyway - long-winded lead-ins aside, this e-mail is to formally announce that Urban Worm Company is now my “official” supplier. This is primarily relevant for those of you who live in USA (most of my subscribers) - although, Steve does have amazing educational resources (including courses) that are available to a much more ‘global’ audience.
As always, this isn’t something I am going to beat subscribers over the head with. I mainly wanted to mention it so everyone understands why I am maybe mentioning UWC a little more moving forward.
There are some other potential things brewing behind the scenes related to all of this, but I will leave it at that for now!
Back to our regularly scheduled programming in my next e-mail.
Bentley
P.S. If you actually made it this far and are curious about the subject line - Urban Worm Company actually does sell chickens now!
Compost Guy Resources
Fun Fact: Red Worms have 5 hearts…so they must have 5 times more fun on Valentine’s Day (that last bit hasn’t been scientifically verified)!
I hope all of you have at least ⅕ the fun of a Red Worm today!
[OK technically they aren't little beating hearts - they are “aortic arches”- but let’s not split hairs today of all days!!]
Mandatory silliness aside…
I just wanted to send out a quick e-mail about some interesting (very very much preliminary) observations I’ve been making in a little test system I recently set up.
Many of you will know that I have been harvesting a decent quantity of isopod “castings” (with a lot more still ready to be harvested) and have been really impressed with how nice the material looks and how easily it can be screened with a very fine mesh.
That’s all fine and good - but the jury is still out in terms of IF this material can hold a candle to worm castings (on its own - the stuff at the very bottom of iso-worm hybrid systems is likely much closer to typical castings).
As cool as the hybrid systems are, and as much as I still see good potential there, the fact remains that “ideal conditions” for these two organisms can be quite different - and somewhat challenging to achieve in the same system. So, I’ve been thinking a bit more about a partnership where they can both be at their best.
On a whim, I decided to set up a small yogurt container test system with a small number of Red Worms, to see how they do with a diet primarily consisting of moistened iso-poop. The initial habitat was basically just a mix of egg carton cardboard, iso-poop, and a small quantity of frozen-thawed carrot peelings (to kick things off).
Truthfully, I was a bit worried that the worms wouldn’t even respond well to the iso-poop in such a small test system - but the early results definitely surprised me in a “good way”.
Not only was it clear the worms were settling into their new home really well (good color, fast response to stimuli like light and touch etc), but they seemed to be getting quite a bit bigger, and surprisingly quickly!
I ended up needing to move my chubby “breeders” over to another experimental system (for a bigger growth trial system I will likely write more about at a later date) - but I decided to add some new small Red Worms to my little tub system so I could continue to test out iso-poop as a food/supplement.
Stay tuned for more updates on that front!
Bentley “Heart of [Black] Gold” Christie
Compost Guy Resources
Just a follow-up to my e-mail from last Friday.
I want to provide a little more perspective re: the ease of screening iso-worm castings vs more typical vermicast.
If you looked closely at the image of the screened material I shared last time (below), you might have noticed there was a fair amount of small debris in it - a lot of it looking like dried grass clippings.

What’s interesting about the way isopods mow through fall leaves is how they decimate the leaf structure itself (surprisingly quickly when you have a high density of them) but leave (no pun intended) much of the vein structure intact.
So, yes, you do tend to end up with some debris if you are using a diversity of materials, especially if adding a lot of fall leaves. It’s important I make that clear.
I don’t personally care about this, or even care about having some small isopods in the material, but I know some people are a bit more particular with their tastes/preferences.
Well, the “good news” about this material is just how fine a mesh can work for screening it. As a comparison, consider that it can even be challenging to properly screen vermicast at ¼” if the moisture is a bit too high. Generally, ⅛” is the useful limit if you expect any sort of decent yield - and that assumes a moisture content and texture that’s really dialed in .
Before anyone squawks back about this…yes, I’m sure there are cases where people have used 1/16” successfully. The vermicomposting system used and/or how the castings are stored before screening tends to play an important role in this.
That said, it’s always important to consider your % yield (what % of the total volume actually makes it through the screen). It’s all fine and good if you can produce some gorgeous 1/16” screened castings, but if 95% of the total volume is getting screened out that’s less than ideal. ;-)
Getting back to iso-poop…
Seeing how effortless the regular screening of the material was, I started wondering about trying a much finer mesh…
…which made me think of our metal mesh kitchen sieve (shhhhh - don’t tell my wife! lol). The mesh on this thing looks like it is in the range of 1/32”. It’s very fine.
My hunch was that it would allow a reasonable amount of the previously-screened castings through - but I was amazed to see that it ended up being the vast majority of it.
What’s really cool is that it seemed to catch a lot of the fine debris and, probably more importantly, virtually ALL of the remaining isopod stragglers.
A little hard to tell from the photo below, but there was far more screened castings than there was screenings. That's always a big bonus (especially with such a fine mesh).
Like any form of screening, I’m sure I could have improved the yield even more by screening it more vigorously and/or for longer, but this results in more debris going through, and the yield was already surprisingly good with my moderate approach.
I will leave it at that for today, but do stay tuned for additional updates on this front and other content (don’t worry, we’ll certainly be getting back to the main focus of composting worms).
Bentley
It’s been a quiet stretch on the e-mail front! I hope all those of you who celebrate the holidays had an enjoyable and restful time with family and/or friends!
I figured I would reconnect here in the new year by sharing a neat little harvesting method I’ve been testing with one of my isopod/worm hybrid systems.
Some of you may not remember me sharing a couple of videos showing the two basic hybrid systems I had set up early last summer. One of them is what I refer to as the “Iso-Bucket” system - literally the most super-basic indoor composting system you can imagine, combining the processing power of isopods and Red Worms.
Here is the original video again if you are interested in watching it :
Whatever you do, don’t make any assumptions about this ugly little thing! ;-)
You might be surprised (even amazed) by the processing power of iso-buckets! As the name suggests, isopods are the star of the show, plowing through high-carbon materials like fall leaves, bark, and wood - even bones - along with more typical kitchen scraps. Meanwhile, the worms serve as a very helpful "clean up crew" down in the damper parts of the system.
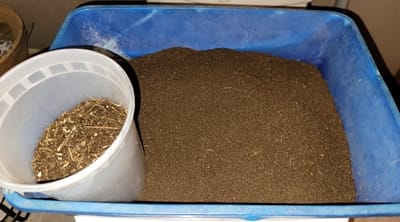
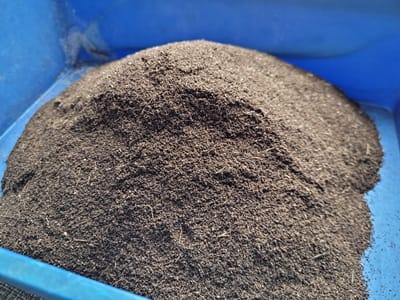
Thanks to the ongoing activity (and growing populations) of these creatures I’ve been ending up with a continually-growing heap of “castings” in my hybrid systems, so I figured I should put some effort into at least harvesting some of it!
One of the really cool characteristics of castings coming from these types of (very well ventilated) systems is that the material has a near-perfect moisture content and texture for screening - like really fine coffee grounds.
It just so happens that someone sent me this little mesh screening tray, designed for worm castings, quite a few years ago. Honestly, it doesn't work very well for regular worm castings - it's just too small and shallow - but it works amazingly well for the iso-poop!
The castings collection process is super easy - I just reach down into the lower reaches of the bucket and grab handfuls of material and put them in the screener (with it sitting in a small tray). I then screen the material very quickly. All the bulky material and bigger isopods that are screened out get transferred to another hybrd system.
I end up with a lot of nice castings in the tray, but I also end up with loads of small to mid-sized isopods that went through the screen.
The solution? Self-harvesting!
Unlike worms, isopods are very mobile organisms. Put them in a crowded container they can easily escape from and most of them will eventually walk out.
As a sidenote, my main variety - Porcellio scaber is not a good climber at all (which is very helpful in most situations), so I literally have to tilt the tray in such a way that they can crawl down and back into their bucket system (see image below).
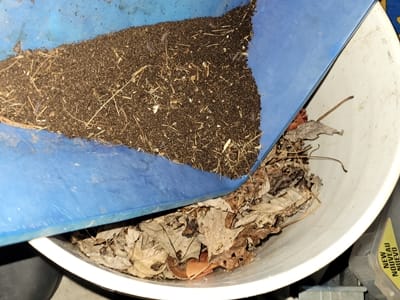
There’s no rush. I just walk away and let them do their thing. Eventually, most of them will have moved out of the material back into their system.
My next step is simply to put the castings in a glass jar with a very loose lid for airflow - once again leaving them alone for a while. Most of the remaining stragglers will make their way to the surface where they can easily be collected with a spoon and transferred back to their system.
The castings don’t dry out in the jar, but there is still enough airflow to keep everything aerobic (as indicated by the rich, earthy smell the material has).
That’s basically it - this process can be repeated over and over again - something I will likely start doing since I have two iso-buckets plus one much larger “mama” system with a lot of castings accumulating down in the bottom.
Just so you know, I'm hoping to make a video or two relating to all this fairly soon (easier to show you the systems/process that way).
On that note I will sign off for today. Hope you have a great weekend!
Bentley
P.S. I definitely want to start testing out these castings for growing plants as well, so stay tuned for more updates about that.
P.P.S. Just a heads-up that most of my educational products (including Composting with Isopods) currently have discounted pricing - you can browse the line-up by following the "CG Educational Products" link below.